How I Use Strand-Based Hair
Added 2020-03-14 00:40:10 +0000 UTCHello everyone. Since people seemed to like the previous tutorial I did, I figured I may as well make a new one for one of my favorite underrated tool in Daz.
Once again I want to preface this with saying that I know everyone is patiently waiting for the update, and do know that it's just around the corner. I estimate only a couple of days until its release. We thank you all for being so patient. It pains me every time we announce a delay, but it warms me greatly by seeing people being so patient and understanding. Oh and also don't worry by thinking these tutorials take away from development time. They do not, so no need to worry.
Now let's get into the tutorial. This time I want to talk about a more underrated feature of Daz Studio that I don't believe a lot of people use. And that is Strand-Based Hair. I do believe there's two main reasons people aren't really talking about this feature and the first one is that there's a lack of documentation regarding it, and the second being that it's still quite new and buggy. However, despite that, I do believe it's still a very powerful tool that can be quite useful for simple scenarios.
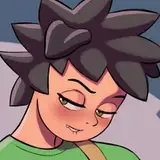
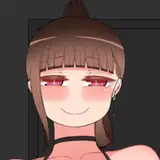
So what is Strand-Based Hair? Well it's a way for you to create hair inside Daz Studio. This hair is fully customizable and fairly easy to use. Let's take this lovely scene of Alice right here:

Now let's say that we want to add some little pubic hair to her but we don't have any assets that we can use for that. Well that's where Strand-Based Hair becomes quite helpful. Let's start with selecting our character and click on Create -> New Strand-Based Hair

A pop-up window will appear asking you what you want to apply the hair to. Let's simply select our character and click on accept.

Now we're greeted with the tool itself. It's split into multiple parts and we'll go over each step of the way. The first is the "Setup". Where you choose what surface you want the hair to appear on. Since we want to create some pubic hair we only need to select the Torso. So select that and head over to the "Paint" section.

In here you will paint on the character where you want the hair to appear. Before we paint however, I recommend turning on Symmetry -> Texture U. This will make it perfectly symmetrical.

Now just paint however you want. You can change the radius and fall off in the settings to the right. And to erase you simply hold in Alt. Don't worry too much about how detailed the paint is, because you will be able to style the hair itself later. This is simply where you want it to appear. Also do remember that this can all be changed freely later, so you can fine-tune it once you have everything set up.


I just went with this cute heart shape.

Now switch over to "Distribute". Here you can give some customization to the density and thickness of the hair.

For short hair, you generally want a rather high density, so I went with 80. Do remember however that higher density means more hair which in turn means longer renders. You can get away with having lower density but increasing the base (and possibly tip) of the hair slightly. It won't look as good though. But I simply left the base and tip at default and changed the density to 80.

Now head over to the style panel. Here you have a bunch of different ways on how you want the hair to look. You can use the comb tool to drag hair in certain directions, or the cut tool to cut the hair shorter in specific areas. You can also use the different selection tools to choose specific parts of the hair that you want to style while the other parts of the hair retains their shape. Now this section is unfortunately where this feature is at its most buggiest, like the comb not really behaving as you'd expect and so on. So there might be a bit of trial and error to get the style you want.
But for what we want to do, which is pubic hair we first need to select the "Extend Curves" tool and scale it down slightly, since pubic hair isn't that long.

Then we want to select the "Curl Curves" and just curl the hair down a bit. But not all the way. This tool does pretty much exactly what it says, it curls the hair down and inwards as you can see.

Now we want to use the "Surface Attract Curves" and slide it all the way to the max. Now what this tool does is that it wraps itself around the closest surface but doesn't go through it. The reason we used the "Curl Curves" beforehand is so that when we used "Surface Attract Curves" it wouldn't go in weird direction and instead it would only go downwards.

However we don't want the hair to be completely flat against the body, so go back to the "Curl Curves" and just curl it up just a tiny bit.

Now we want to switch over to the "Clump" section. And this section is exactly what it sounds like. It's where we decide how much the hair will clump together. I recommend turning on "Show Hair w/ Widths" and sliding the "Amount" to 100%. Be aware that this will tax the computer more, so if you're working with very taxing hair and you slide the amount all the way to 100% then it might slow down your computer.
Now you can play around with these sliders to just get the result you want. But I usually just drag the "Strength" for "Clumping 1" and "Clumping 2" up a bit. Like 20% or so. And then leave the rest at default.

Finally we switch over to the last section, which is "Tweak". Here it's really just playing around with the values and see what you want. The main thing I believe is important here is "Frizz" which gives the hair that wavy and curly look that pubic hair tend to have. Another thing I like to play around with is "Random Length" -> "Length (Max)". This will make the hair feel a bit more natural since not every hair strand is the exact same length. I played around with the other parameters too, mainly just touching the "Strength" on them. Try just sliding them up a bit and see what effect they have and see if you like it.

And now we're pretty much done. You can click on accept and the hair will load in. You won't see the actual hair though in preview until you enable "Preview PR Hairs" in the parameters. If you've created taxing hair, then enabling it on preview will make your viewport really slow. But for this small hair you should be fine.

Now you can play around with the surface settings of your hair. Mainly "Hair Tip Color" and "Hair Root Color". However, I feel like the default surface settings they give you is pretty bad. So what I like to do is substitute the surface settings completely.

To do this you first need to select the hair surface and go over to "Presets" and click on "Iray Uber Base".

Now you can simply load in any hair you want. There's a ton of universal hair shaders on the market. But if you don't have any of those, then there's always the method of copying the head hair's surface materials and pasting it onto your Strand-Based Hair's surface materials.


Universal hair shaders are almost always a better alternative. Since the hair you just copied wasn't originally meant for anything else. But usually it works fine. And this way, the carpet will truly match the drapes.
So now you should be left with something like this.

Perhaps not the best, but for a process that took about 2 minutes and it's a feature that's free and included in Daz with no third party program needed. I'd say it's damn good. And of course what makes this all great is that it's fully customizable. So let's say we think the density is a bit too low. Just go into Edit -> Object -> Edit Strand-Based Hair and you will be able to freely change around anything we did prior to fit your preference. So for this, let's increase the density from 80 to something like 150.


And maybe you don't like the heart shape of the hair? Simple, just go in and repaint it. All other settings will stay exactly the same when you're done.

Once again, this might not look as good as some store bought pubic hair asset. But the tool allows for full customization, which means unlike store bought assets, you can play around with this tool until it perfectly fits what you want. This is just the result I got from doing something very quick and rough in 2 minutes. Imagine what you can achieve if you...You know, actually spend time with it.
Now another thing that is interesting with this feature is that it's dForce compatible. For those of you who don't know, dForce is a way to simulate clothing and hair so that it falls down with gravity and collide with stuff. However, I have found it to be excessively taxing and buggy. So I recommend not really using it. Hopefully it's something they will fix in the future though.
And that's all for this tutorial. I hope it helped you understand this feature from Daz a bit better. And do know that it's not necessarily for hair. It can be used for hair like things like grass for instance.
Hopefully the next time I make a post it will be for the release of FF v0.25. Hope you all have a good day!