Well, the time has come to introduce to you all some tips and tricks on how to mirror a classic Cory post.
First things first: you DO NOT need photoshop to achieve these looks. Does photoshop help—yes—but we are all on a budget!
The apps I use go back and forth between Facetune 2 and Snapseed.
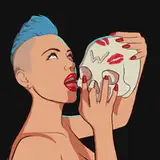
First: Upload the image you want. Now, depending on which eye color you want, (I go back and forth between black and white) go to the VANISH button, select, then wipe the eyes clean. Easy huh? Don’t fret if you eyes don’t look perfect—you don’t want them to; in fact, I think a cleaner eyeball makes for a less realistic image. Satisfied with your eyes? Good. Now…
Second: Work your images jaw and teeth to the appropriate width and teeth size.
*NOTE: it’s important to exaggerate your facial expressions for this editing tutorial. I know it looks stupid at first glance, but trust me.
You’re going to select RESHAPE to pull the jaw downward and mimic a ‘Grudge’ like look. After you’ve pulled your jaw, select REFINE to sharpen your teeth to your desired length and shape.
*NOTE: You need to pay attention to realism as best as you can. Always zoom into your image to adjust the pixels. The more you zoom into your image, the better it is to edit. Make sure when reshaping and refining, you pay attention to exterior detail. People do pay attention to detail, and sometimes reshaping can fuck up the rest of the image if you’re not careful.
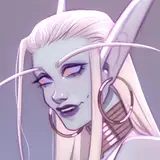
Third: Now that you have your desired eyes and face, we are going to start playing around with shading. You’re going to select PAINT and focus ONLY on shading. We aren’t going to worry about actually painting anything, as it becomes too much. Select SKIN and let’s start shading around the eyes. Shade to your desired look. Depending on how dramatic or tired you want your image to look is how much you’re going to shade.
*NOTE: Less is way more! Don’t think you need to go into digital paint and try and make everything black and dark. Only focus on subtle changes if you’re a novice. I’ll go into more advanced editing later on down the road.
Fourth: Once you have the appropriate shading and look, we are going to start making that detail pop. Select RETOUCH and select DETAIL. Go over the areas you wish to accentuate. Now, I personally like to go over the eyes, latex, and teeth to put the emphasis there. You can do whatever you want, but remember—less is more!
And congratulations! You’ve officially completed your first course C.D.C.’s tutorial! Please note: I had to learn A TON to even get as good as I did. I don’t expect anyone to literally recreate what I do, rather, I just want to point you in the right direction! Part 2 coming up shortly! Happy Editing!
Cory Cowley
2021-11-06 15:55:55 +0000 UTCWilliam Lantry
2021-11-06 15:50:24 +0000 UTC