
Hey everyone!
The plan was to release Battle Test 2 today, but Ubercharge has been working with me a lot the past few days teaching me some heavily improved character lighting techniques, as well as better grading for environments, and as such I want to finish re-lighting and rendering the characters with these in mind (I’ve got some examples below). We’ll release Battle Test 2 as soon as it’s done at the $3 tier though. As mentioned in the last Inner Circle post, we still plan on releasing Battle Test 3 in the next Inner Circle post.
There’s still a lot to show off and discuss -- so much so that I’ll list the topics below -- and I’m going to start off with the stuff we’ve accomplished in the last few days and work backwards so the Inner Circle crowd doesn’t have to hunt the newest stuff down :D.
IMPORTANT! If imgur links report an "error" it's BS. Just reload the browser page (CTRL+R) and it should work. We're looking for other solutions.
Contents for this Update :D

Improved Eyes and Mesh Lighting
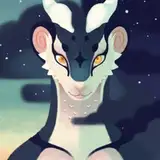
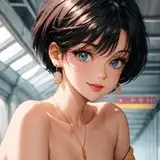
Now that we’re pretty deep in the uncanny valley, really subtle things can make a huge difference with the characters. After working with the poses for awhile I decided the eyes weren’t really up to par. What it boils down to were some cartoony remnants conflicting with the new style.
Ubercharge and I spent a full two days on it, and the result is what you see above (also in Malise's reworked portraits). After failing in previous attempts, I finally got subsurface scattering working with the whites of the eyes so light transmits through them and they don’t appear opaque. This also allowed me to get the irises to blend properly instead of the sharp line you saw previously. Another major issue was the shadows on the eyes -- there simply weren’t any. This sometimes gave a similar effect to the crappy eyes in Mass Effect: Andromeda that I’m sure most of you heard about. The problem was pretty goofy: the faux eyelashes Daz characters use (planes with transparency maps) weren’t casting adequate shadows. We therefore got real 3D fiber eyelashes and it seems to have done the trick.
The last piece of the puzzle was the lights. I’ve been using Daz’s lights for character renders, and you can’t add textures to them. This means that lights were completely bright squares/discs/etc. I’m now using textured HDR lights, much like Uber was experimenting with in Redshift a month or two ago. Interestingly, this makes enough of a difference to make eye reflections more natural.
This may all seem unnecessary, but the results speak for themselves I think. Anyways, still need to do the eye fixes for Neon, but experimentation was most of the work here.

Ubercharge’s Procedural Materials for Maya
Uber has been busting out some seriously impressive procedural materials in the last week that he intends to use for environments. The beauty of these is that they look good on non-UV mapped objects (UV mapping being a time-consuming process of mapping the way textures wrap around 3D geometry). The way the procedural materials work is by algorithmically adding features intelligently – such as dust in crevices or damage around corners. This is valuable for us since a lot of the environments in MATM will contain a lot of hard surface geometry – metal / machinery / concrete. These are all things which have a pretty standardized look and are therefore great for this kind of thing. Uber will be using these on the map he’s currently working on, saving TK days of UV mapping that was required on the other maps we’ve done so far.

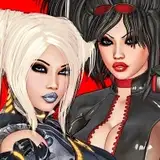
Reworked Malise Portraits and Improved Lighting
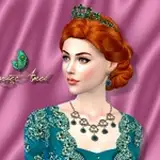
Ubercharge basically gave me a master’s level crash course in character lighting the last few days, drilling in the importance of darkness and proper brightness for a realistic style, as well as some techniques for better rim lighting. When this started I was probably 75% finished with what I had in mind for the portraits for Battle Release 2, so even though I was pretty frustrated with the idea of doing parts over I decided that what I learned from Uber was good enough to merit re-lighting things. Well, I ended up redoing it something like four times until I got it right. Here’s what I have so far (the character and materials are the same... only lighting and the eyes changed).
Well, aside from the lighting changes you probably noticed that a couple portraits were different. The reworked Malise portraits for this release are rendered from a different position to better acquire the camera perspective and correct environment lighting. This should make previously ambiguous poses more readable (like the escape pose).
I decided Malise looked weird firing one gun all the time (plus it didn’t make for a very aesthetic pose), so I thought it could be a cool character mechanic for her to attack twice with her base attack. I figured this could be a feature to differentiate her at the core from other characters, and we could build her weapon skills kind of around that. The new attack pose certainly looks better. Here’s a comparison GIF showing the progression. I’ve yet to render this one with all the improved lighting.
Expanding the Crowdfunding Campaign to Enty
If you recall back around October we had some issues with Patreon. We’re not sure what direction they are going to go with their tolerance for adult content, but if that bump in the road was any indication it’s not going to become a smoother ride for adult projects anytime soon. Don't worry, we don’t plan on going anywhere, but in the event Patreon backs off from hosting adult projects we will obviously still need funding. Therefore, we’ve decided to establish a campaign on Enty, a Japanese crowdfunding site with virtually the same model as Patreon. The key difference is it is largely designed for adult content projects. They have created an English side to the site (which still has some Japanese UI elements, but they seem to be working on it), and after discussing it with their staff we shouldn’t have issues receiving funds from them. In addition, I’ve hired a translator to help manage a Japanese version of the campaign, and I’m making it my next immediate goal after Battle Release 2 to get that page rolling. Not only will this provide as a safety net for us, but it will allow us to expand our audience in a way we haven’t been able to before. We already have most of the content for the launch ready, including the battle test translated into Japanese, so I’ll let you know how it turns out.

AltairPL’s Coding Update Pt 1 - Localization
Considering the recent problems with Patreon, Eromancer decided to start an Enty campaign, which will act as a backup/alternative to Patreon, but will also improve access to MATM for players from Japan. At the same time, the decision was made to translate MATM, or at least current battle test release, to Japanese.
Thankfully, one of the things I brought with me when joining MATM dev team was a working prototype for localization module I devised for the game I was working on in RPG Maker XP prior to MATM. Bad news is that some things between RPG Maker XP and RPG Maker VX Ace (used by MATM) have changed so much that it will still take some time to port the code. Good news is that most of the things needing localization are already using localization module or are ready to do so. All in-game menus were switched to using localization menu as I was working on them and are updated on-the-fly. Database elements, like names of characters, items, skills, etc. were capable of using the localization module for some time, but only just now were a few of the ones needed by the battle test release actually configured to use it. The most problematic thing of all was the choice window displayed between battles in the battle test release. It's one of those things I haven't touched before, so it was a bit of a task to convert it to a form compatible with localization module. Using Japanese language file revealed some problems and issues but all in all the test went pretty smooth.
Since this is the very first time the localization module has been mentioned, at least that I remember, I'd like to point out one more related possibility. I don't know what Eromancer's plans are for localization, but even though English and Japanese will be the only current officially supported languages, there is a chance that fan translations will be possible. In this case, a person willing to make such a translation will receive a set of neatly organized (yeah, right) files with strings, probably some additional localization aiding tools, and our blessing. In any case, don't even try to bug us about it now, cause it's a long way before this will become a possibility and everything about it may still change.
AltairPL’s Coding Update Pt 2 - Pre-processing
Third most important thing I did since the last update is something I wanted to do for a very long time, but I could never find the time. I finally optimized game database pre-processing. The point of pre-processing is to convert some database elements’ structure, options and settings, especially custom ones, to a much more accessible and optimal form used by the game. As a result, game code is much cleaner and optimized and some aspects of the game perform much better/faster.
Till recently, such pre-processing was performed unconditionally every time the game play-test was started which resulted in few seconds wasted time and a bunch of extra writes to disk. A few seconds may not sound like much, but it grows quickly when testing new functionality, which usually requires restarting the game a lot. Pretty much the same goes for disk writes, but instead of time, SSD longevity is being saved. Besides, some future functionality will dramatically increase pre-processing time, so this optimization was only a matter of time.
AltairPL’s Coding Update Pt 3 – Everything Else
Battle Test Release 2 Progress/Features
Since we’re preparing for our Enty launch I decided to get Neon into this next test release, as I think it would make a lot more sense to people who haven’t seen the game before. Here’s a (nearly complete?) list of features.
We intend on putting out an additional release for the Inner Circle probably a week or so after Battle Test 2. That one will feature HDR processing, so among other things, Neon’s armor will look much better.

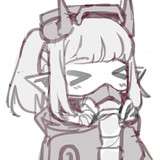
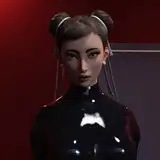
Neon’s Remodeled Armor and Battle Portraits
TK has finished remodeling Neon’s armor, and it looks and functions great :D. Here are some high res shots of it in action. Most importantly is that it performs far better when working with it in Iray. A close second is that it looks far better in close-ups without artifacts from Iray’s displacement mapping. Among a few other details, I still have to tweak and add the displacement maps to the bump channels in order to be able to do some full quality renders, but I’ll have those for you in the upcoming post (I’ll also get to show some examples of the lights in HDR).
As far as her portraits go, I still have a few poses left to do for her, but quite a bit of time went into making fixes that only became apparently with her Genesis 3 figure/armor once I started making the poses. We’ve got those wrapped up and it’s all working well now, so beyond finishing the poses I’m hoping we can get the eye fixes working for Neon as well.
You can check out a few of her unprocessed pose renders here (note these don’t include the eye or lighting improvements). This is the first time we’ve shown off Neon in a while, and the skin / face changes are pretty apparent (here’s what she looked like soon after we first showed her off, before we had skin right).
If you’ll notice on the portrait renders, I decided to leave bloom out of her lights for this release. I’m saving that for the release the week after since we need to update the sprite system to allow for HDR processing. We’ve done the testing and everything should work okay, so it’s just a matter of coding it. Here’s an example of what it should look like once we add HDR bloom/glare.

Ubercharge’s Map Progress
The first ARIS station map is finished, and we’ve done bunch of sprite lighting tests, as well as some to properly grade and layer fog to get sprites to blend correctly. You can check out a full sized uncropped example here – zoom in :D (keep in mind sprites look a bit weird since sprite reflections and shadows aren’t in yet). This is the first map Uber has done with procedural editing and HDR in mind, and it’s already a much smoother process of getting the assets to blend properly. This process is also a better one for our workflow since most of the lighting editing is done in post using a pre-wired template, and doesn’t require juggling a giant 3D scene around between us, or having to mess it up just to make edits later.
Uber has begun creating the props for the next map, which will include the lift that takes Neon and Malise from the perimeter wall into the streets of the Void. Here’s a preview of the model he’s working on for that.
Sprite Lighting System in RPG Maker
We had previously planned on creating a separate sprite lighting system just for v0.06; one that would look “okay” but be compatible with RPG Maker. APL however spent a day testing out crazy ideas for how to get the sprite lighting system we intend to use with our URGE engine working in RPG Maker (we showed off a while back – skip to 44 seconds on this video for a reminder :D ). He actually got it working, but at a severe hit to performance (among some other limitations). While I get 2800 FPS in URGE on our map test, RPG Maker struggles to hit 60 and stutters very noticeably every second or two. Unfortunately, there’s no way to optimize this any further in RPG Maker. It doesn’t have access to the video card, so anything graphically complex will be tough on the CPU. The messy part of this is that it would take a significant amount of time to get another decent looking system going and set up for all the maps (there’s some manual work involved).

Battle Interface Concept
I needed a break after the monthly update, so I changed gears and worked on some concepts for a new battle interface to better fit with the new art style. I tried a bunch of variations, but this is the one I like best so far. And here is the current UI for comparison. I’d still very much like to get a UI artist on board eventually to overhaul the entire UI theme, but I think something like this at least doesn't conflict with the new style as badly, and could serve as a stepping stone.
Some things this concept design accomplishes:
Unfortunately, we won’t be able to implement this in RPG Maker since it will likely require some shaders for the text and glow effects, so it probably have to wait for the new engine.

Cutscene Demonstration Video
Check below for the link to our little cutscene demonstration video. This little project pushed us to learn, implement, and calibrate a lot of techniques and features we’ve been working toward (check the topics below for more on this :D). Where practical, you can expect to see these throughout all the future artwork, especially now that a lot of the heavy lifting has been accomplished.

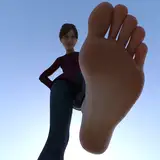
Soft Body Dynamics Simulation!
Something kind of subtle you may have noticed in the cutscene demonstration is Malise’s skin deformation. This is my first test of simulated soft body dynamics, a technique meant for exactly this purpose. Previously, when something interacts with a character it would simply clip through their skin instead of squeeze it. We had a few cases in the old artwork where we manually sculpted fixes, but ultimately simulation yields quicker and (in complex scenarios) better results. For this, I’ve learned the basics of Maya nCloth, a tool that is primarily a cloth simulator but doubles for soft body dynamics when you “pressurize” the target object. The above image is a simple example of the preset I created for the purpose of simulating interaction wit dem jiggly bits. Here is a video I made showing it in realtime. Note that it’s a lot slower on a more complex figure like a body, so practical simulations usually take a minute or two.

Wetness Maps and Improved Liquid Simulation
This cutscene demonstration is the first example we’ve done of a fully processed scenario with liquids. It contains the results of two liquid simulation passes, a dry pass, and pass created using Ubercharge’s texture-based wetness mapping technique. These passes are composited via masking in post. While the masking is manual, this process works in such a way that we can apply our edits to future renders in different lighting scenarios with no (or few) manual corrections required—something that absolutely could not be done with hand painted liquids. The downside is the liquid takes a long-ass time to render without noise, and multiple passes multiplies the render time. Eventually I will need to update my custom render manager code to work with the new rendering engine so I can automate the rendering process.
I rewired our Houdini procedural network for liquid simulation for easier navigation, and in just the past day Ubercharge improved the ease of use and results yielded by the bubble-izer. He also added control nodes allowing for me to change all useful variables from one spot.
Composing Cutscenes in Adobe Premiere
By now you probably know our cutscenes take 2D images and emulate moving them in 3D space to make them more interesting. Up till now I’ve been doing this entirely via code, actually programming coordinates and zooms by hand with no preview. If you remember a while back I did a test where I reconstructed a portion of the Ven cutscene from v0.05 in Adobe Premiere to see if it could work as a solution for composing new cutscenes (see the ‘Story Cutscenes in Adobe Premiere’ section in this update). It worked great, and this cutscene demonstration is the first chance I’ve gotten to try composing from scratch in Premiere. I found that it speeds up the process something like tenfold, and allows me to try things I couldn’t have done previously since I can see what I’m doing in realtime.
Something you haven’t seen thus far in our cutscenes is smooth camera movement, something Premiere (and any decent 2D animation or video editing software) accomplishes by adding curves to zooming/panning/transitions. As this demonstration makes use of it, it’s worth noting AltairPL has since added it to RPG Maker (and will do so in our new engine). Not only do we plan on using it in this way, but we will be able to add curved movements/fades to pretty much anything, which once calibrated should make things look a whole lot more professional. Below you’ll find the details of his work on that!
AltairPL’s Bezier Curve Implementation
The stuff that took me most of the time since the monthly update was also the most fun and fulfilling task in a long time. Even though it was in a very early prototype stage, Ero decided to add it to the list of things I did since December monthly update. The Bezier curve algorithm now been implemented for some practical application, so I can go into the details.
If you ever used some more or less advanced image editing software, especially vector graphics, you probably are familiar with Bézier curves. It's a very handy tool for drawing, but it may also be used for other things, like in our case, 2D animations and stuff. At the moment, pretty much all effects and 2D animations in-game, like slide in/out, appear/disappear, etc., are using linear transformations. This means a moving element in an animation moves with the constant speed, like two pixels per frame. It causes the game to look sometimes very stiff/static/mechanical. Utilizing curves will give us the ability to break that monotony and to make various effects much better/nicer and even easier on the eyes... see below for few examples.
The beginning of Bézier curves implementation was a major pain in the butt, since I forgot a lot about the much-needed math, but after few initial problems, the rest was kinda fun. For some weird reason, every little thing added to this code, no matter how small, brought me a lot of joy and sense of fulfillment. Progress looked like this:
With this update in mind, I've prepared simple in-game turn indicator animation showing difference between linear and curve-based movement, which you can see here. After that I've started and pretty much finished implementing curve support to vanilla RM pictures used during events. I was pretty sure I won't be able to pull it off before the IC update, but I'm pretty sure we can now achieve in the game what Ero did in his event video.
Another nice thing about all that is that I will be able to simplify some parts of the code significantly with only slight performance cost, but with much easier transition of some effects to non-linearity when needed. Most likely doing this will be my next step.

High Dynamic Range (HDR) Processing
I’m really glad to have this feature in our workflow for character art. If you check out the cutscene demonstration, the realistically modeled light glares and bloom are a facet of this new capability (they are, admittedly, exaggerated for the purpose of showing them off). As I mentioned previously, this is something Uber is doing for new maps as well. He spent a day teaching me the basics of the procedural program he’s using, and I’ve been using it since. Due to the scripted nature of cutscenes it’s simpler to utilize there (and probably in menus), but portraits are a bit tougher. Getting this right is what we will be working on for Battle Test Release 3. Until I came up with a solution for doing so, it wasn’t possible to use this feature on any graphics with transparency because it won’t render on transparent pixels. The solution isn’t as simple for portraits. While we have a plan and have tested it in graphics programs, APL still has to implement it in-game and we’ll have to see it firsthand before we’ll know if there are any issues.
Goals for this Month
The three immediate things on my mind (and in this order) are
Aside from that, there needs to be a good few days where TK and I simply sit out and update my character scenes and clean, because I’ve made a pretty big mess jumping from one thing to the next with all the character revisions the past couple months. TK will likely be working on the remaining bits of Neon’s armor damage version, and after that we will probably begin looking at Malise’s. AltairPL will for the near future fixing remaining bugs from the first battle test, as well as making grapples compatible with his full concurrency ATB system. Once that’s done I would love to finally try out all the new things I’ve learned on some actual H content >:D. Last but not least Ubercharge is still busy with his procedural materials and then will continue work on his latest map (which I still need to do a block-out design for). At some point we need to do a map events test, which will show we can run animated map events in the new style. Perhaps this can be included in one of the next test releases.
Apologies for not having Battle Test Release 2 ready, but hopefully you like the improvements we’ve been working on. Thanks for reading, and thanks again for your support guys!
Carter Parks
2018-02-21 20:48:36 +0000 UTCAltairPL
2018-02-21 04:39:06 +0000 UTCMangoFishSocks
2018-02-19 05:03:24 +0000 UTCJames Denning
2018-02-18 22:30:48 +0000 UTCJames Denning
2018-02-18 22:27:53 +0000 UTCMangoFishSocks
2018-02-18 20:19:23 +0000 UTCMangoFishSocks
2018-02-18 20:15:05 +0000 UTCMostacho
2018-02-18 13:41:20 +0000 UTCMostacho
2018-02-18 13:37:05 +0000 UTCMostacho
2018-02-18 13:33:31 +0000 UTCTorsten K
2018-02-18 13:28:20 +0000 UTCHmmjon
2018-02-18 13:04:15 +0000 UTCBadguy292
2018-02-18 05:28:47 +0000 UTCMostacho
2018-02-17 22:18:43 +0000 UTC


