

FINALLY!
I’m about a week late with this post, but hopefully the video shows we’ve been working our asses off. There’s a whole lot more progress to show that I didn’t include in the video, so be sure to check out some of the topics below for images and what not. Ultimately, I think this is the single longest Patreon post we’ve made >_>.
This whole past month has admittedly been anything but smooth. Between steep learning curves for TK and I, illness for Uber, and some major bugs cropping up in Daz that seemed hellbent on throwing wrenches in our plans it’s been a pretty bumpy ride. We were effectively a man down for most of September due to Ubercharge developing what turned out to be a really serious eye infection in his dominant eye. For the last half of September he was unable to see out of the eye, and could only look at a screen for brief periods. It culminated in him having to get an injection in his eye, and only in the past week has he improved to the extent that he can work regularly again.
Enough of the excuses though :D, let’s get on with showing off some stuff!

Neon Revamped for the New Rendering Engine
Since this was obviously the main focus of the video (and most of the reason for this post being delayed) I figure I’ll start here!
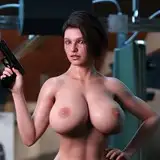
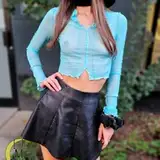
As with the previous conversion of Onyx, we knocked out a conversion of Neon for the new rendering engine. This was infinitely more complex, as Neon was made using an older Victoria 4 body system for which high quality textures that our new style demands simply don’t exist. This goes the same for her armor assets. In all I created over 50 new textures for her armor alone in order to take advantage of all the features of the new rendering engines.
We originally didn’t plan on doing this until the artwork overhaul we have scheduled for after v0.06, at which time we will make a full upgrade of Malise, Neon and Ven to the newest Daz Genesis body systems. We determined however our old assets simply wouldn’t work with the new art style, so as mentioned in our report for last month we’re calling what we’re doing now a soft artwork overhaul. The goal is basically to get our leading ladies up to snuff for the new art style, but we’ll worry about the back-end body mechanics junk after v0.06. The good thing about this is our work won’t be wasted; all of our effort going into retexturing and shader/material improvement now will either translate directly to or will save a ton of time when we eventually make the full conversion over to Maya.
One major problem we had to overcome here was the fact that the Victoria 4 body has different UV mapping than the newest Daz Genesis models. UVs are the method by which 2D textures are wrapped around the 3D model; a model with different UVs means the nose could end up on the ass and so forth. Therefore, in order to get the shiny high-quality textures available for Genesis working on Neon, we had to re-map her UVs. TK pulled some Maya black magic out of some orifice and achieved this in a single 16 hour day. I was then able to take all the things I learned from Onyx’s conversion with regard to skin and hair and apply them to Neon. In the process, I’ve actually gotten quite a bit better and was able to improve upon my skin/eyes for Onyx. The eyes especially! There are now no fake reflections or anything – it’s all physically based. Naturally, all of my new findings went into Neon as well.
At least on my end, the body was the easy part. Daz reared its ugly head in the nastiest way with the armor, causing me to lose a few days trying to overcome a series of bugs that caused Daz to inexplicably use the CPU for rendering instead of the graphics cards (this increases rendering time from about 20 mins per final render for the new style to multiple hours). Luckily, I traced the cause and eventually found a workaround that, while inconvenient, will carry us through to when we convert over to Maya.
Here are the high-quality versions of the images of Neon used in the video! These are all really high resolution, so they might actually make good 4K desktop wallpapers if you are so inclined. In addition, I’ve amassed a bunch of images from the construction process for you to check out! Thanks again for being patient with us while we knocked this out!

The Void – Perimeter Wall Map
The map shown in the video is the player’s introduction to The Void. I wanted this one to have a lot of impact since it basically is where v0.06 begins to heat up. This video was actually shot in RPG Maker, so it should be the quality you can expect for v0.06.
TK really stepped up his game on the textures for the platform. He actually did it twice since he wasn’t satisfied with his first attempt. After receiving some instruction from Uber (whose eye was messed up at the time), he went through it a second time. This was only his second texturing job using physically based rendering, so it’s exciting to see him improve so quickly.
On the other end of things, I jumped in and helped with this map, and got a real trial by fire with the background artwork. It’s the first real map I’ve had to work on in Maya with the Redshift rendering engine, so while I’ve been learning a lot, it wasn’t super speedy for me. It’s a pretty complex scene due to the number of structures, and I had to learn a technique called proxying which allows Redshift to instance geometry to conserve memory. I basically built two huge slum tower segments from assets Uber had prepared previously, then instanced them around the scene to build the towers. After my first test render of the scene took 12 hours (without even finishing), I spent a full day learning and testing the intricacies of Redshift’s render settings. It proved useful as I was able to get the render time down to 3.5 hours for all the layers needed for the parallax effect shown in the video with virtually no loss of quality. I also spent some time learning the required Maya skills for using Ubercharge’s procedural damage technique we showed off awhile back with the intent to make the slums really grimy looking. While I got it all set up and working, it still requires some time in the oven and I figured we’ll save it for after V0.06 once the maps need upgrading to 1080p. Lastly, since this is the first map we’ve gotten to test in the new widescreen format, APL and I spent a day tracking down bugs and making necessary improvements to the map system. Anyways, you can check out the full size composite render of the background here (make sure to zoom out)!
To boot, here’s a gallery of images showing some of the construction work on the map: The Void – Perimeter Wall Deck 2 Gallery

The Void – Market Alley Map
Before Uber started having issues with his eye he created this awesome map that will be used in V0.06. This is an example of one of the city maps within The Void after the characters descend the perimeter wall.
Here’s a gallery showing off the details and construction of it: The Void – Market Alley Gallery

The Many Many Assets of Ubercharge and TK
Despite Uber being blind for most of September, he and TK converted a whole crap ton of assets to the new rendering engines; many of which in just the past week. I’ve assembled a gallery of all the new shinies here!
New Track Added to Soundtrack Rewards
The music in the video will most likely be the song used during the Void exploration in V0.06. I’ve uploaded the full track to the Soundtrack Rewards!
AltairPL’s September Progress Report
So, I noobed up and forgot to include AltairPL’s progress update in the monthly update last month ;(. Here it is!
AltairPL here! I started August with a long list of immediate TODOs, but instead of shrinking, it only grew bigger. That doesn't mean I made no progress, though -- the list below may not look too impressive, but I'm pretty happy with my accomplishments this past month:
AltairPL’s October Progress Report
The “basic URGE functionality” mentioned above was my main time sink in September. Most of the stuff included in it was mainly some pretty basic stuff until recently hard-coded into the engine, or poorly made since I was just starting my C adventure back then. Not counting boatload of smaller stuff, there were also few very important things, at least for me, that I wanted to achieve:
Among other things I did in September, most notable are:
My plan was to use rest of September for preparations and some other organizational stuff and dive back into game's Ruby scripts at the beginning of the October, but said preparations/organizational stuff went smoother than anticipated, so I expedited Ruby diving a bit. Anyway, URGE is going on shelf for the time being, so I have time for more immediately needed Ruby game scripts.
Recently Ero was bugging me about few minor map GFX features, so I started with them... even though they are not really worth a mention, they have pointed me in the "what's next" direction. A lot of stuff related to map GFX is in a very poor shape (try to picture Frankenstein's monster made of code and images ^^) and I have related overhaul in my TODO list for ages... leaving it for later will only result in more maps needing conversion, which is always a pain in the butt, so the time for it is as good as any. I think I have it all planned already and am currently in the early stages of the overhaul.
No idea how long will it take me, since there are some tricky things that may kick me in the butt if I'm not careful. Anyway, next in line is finishing up 4:3 to 16:9 conversion and then battle engine, which simply has to be done before 0.06 and I simply don't remember where I am at and how much work it still requires... damn, and to think that I started experimenting with SDL just to take a break from battle engine, and now I have game engine of my own in "advanced" stages... if that's not a derail, I don't know what is ;).
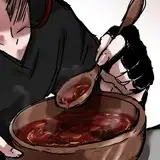
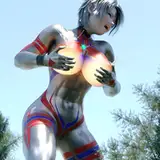
Compositing and Liquid Material Testing
We sort of killed two birds with one stone here. The following tests from early September evolved from an experiment Uber concocted with the goal being to composite renders from Iray (in Daz Studio) with renders from Redshift (in Maya). The test turned out however to be a good opportunity to test the liquid materials we’ve been working on, and I think we made some progress there because of it.
First up is the compositing thing. Being able to incorporate renders from Iray and Redshift into a single piece is a pretty valuable piece of functionality for us, and could possibly serve as a backup plan if we can’t fully convert our characters to Maya during the artwork overhaul. Using this method, we could do things like use monsters created in Maya and rendered in Redshift in H scenes with characters from Daz / rendered in Iray. One element of difficulty in doing this is that light and shadows would be heavily affected by characters/creatures in proximity to each other, and since PBR rendering isn’t as forgiving as our previous style it’s not as simple as masking the characters out in Photoshop and plopping them in the image. A second is that layered, translucent liquids simply can’t be masked easily.
Uber’s solution involves taking a completed Daz render of a character, and projection mapping the image as a texture onto a static model of the character/pose that’s been imported into Maya. Here are a few images of this process. We then import camera and light positions from Daz to approximately reproduce the Daz scene in Maya (once we standardize our lighting for portraits we’ll be able to have matching lighting rigs in both programs, making the task of matching the lighting much easier).
To show a full test of this technique, Uber decided he would composite a basic slime prop onto Onyx with his custom WIP liquid material. This is a difficult task due to the translucency of the liquid, but the technique worked great!
Naturally, doing this turned into a chance to work on the liquid materials more, so I took a stab at it in Daz while Uber worked on techniques to add subtle but advanced effects such as bubbles and texture. While none of this is representative of the quality we should be able to manage when we get around to actually generating liquid geometry via simulation, it’s a good step in creating accurate materials that should work in a multitude of situations.
Oh, and bottoms up >_<.

Story Cutscenes in Adobe Premiere
The first thing I did (besides drink way too much) after the monthly update last month was to experiment with an idea I’d been thinking about since I started using Adobe Premiere for video editing. I’ve been wanting a better solution for creating the panning/zooming/layering effects for story cutscene events for a while, and now I’ve got one!
Creating the cutscenes in RPG Maker is pretty much as low tech as it gets. All the layer animations are done via code. Basically, I have to position every image by its coordinates manually, and every time an image is moved/zoomed/rotated/whatever I have to compute the new coordinates by hand (and by guessing too, since there’s no way to preview it).
What I’ve found is I can set up Premiere’s video sequencer to act as a cutscene editor. By setting the coordinate system to match the one used in RPG Maker and URGE, and by using frames as the timecode instead of time, I effectively have an environment where I can create cutscenes as a video, adding cues for things such as message boxes and events. Once that’s done, I can use the information stored in the sequencer’s keyframes to get things such as coordinates and frame numbers for events, and use those to create the code for the cutscene event in engine.
Still low tech, but this solution will probably cut a week of work off of v0.06 alone.
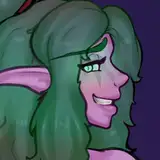
Ubercharge’s Monster Sketches
There was some discussion in one of the previous threads regarding monsters, and I think it inspired Uber to spend some time sketching ideas while he was out of town early in September. Being able to break away from licensed assets and create our own creatures will no doubt give us some freedom, and if these quick concepts are anything to go on we should see some really detailed stuff in the future :D.

ARIS Scene Revamp, Graphics Conversion, and Concept Map
APL, Uber, and I spent a morning late last month drumming up solutions for how to accomplish the ARIS units with the new artwork style. The problem is largely that the ARIS event requires the character sprites (in all their eventual variations) to be embedded into the ARIS graphic. This wasn’t a big deal with the old art style since lighting was flat and ARIS machines would fit into any scene. With the new art style the lighting has to be dead on else it’d look completely out of place, meaning we’d need to do a sort of “save room” type deal that some games do; basically all ARIS machines would be in similar looking rooms to prevent needing an exponential crap ton of versions of the ARIS/sprite graphics. This would be a pretty big encumbrance for map design throughout the game, so I wanted to find a better solution. I got to thinking about the reason we wanted to include the character sprites in the ARIS event anyways. While neat, it’s not adding much. This led us to our solution: we can add some sex appeal to the ARIS events by changing the screen to show the characters up-close and in high detail inside the ARIS unit.
Basically, the player would use an ARIS unit like normal: press the action button and the door opens. The screen fades, and instead of fading back in on the character sprite in the ARIS machine, the game would go to another scene in which it shows the party inside the ARIS unit (kind of like a mech pilot camera in the cockpit). The event would play out like it does now, but it’d be done within a modified version of the game menu where you get to see some detailed artwork of whatever state your character happens to be in. Once you exit the menu it’d be like exiting an ARIS unit in the current version of the game – the screen fades out, and fades back in with the ARIS unit closing behind the character.
It’s a little tough to explain without a mock-up to show off, but hopefully the description got the idea across. Doing it this way will allow us to have ARIS units anywhere in the environments, and at the same time add a neat component to the H system.
Beyond that, now that Uber can see again he was able to convert the asset for the ARIS unit during this past week and implement it into a concept ARIS map design.
Hardware Upgrades
TK, Uber, and I all had major hardware upgrades this month. In total, and thanks to your guys’ contributions, we spent over $7000 between the three of us on upgrades. Ubercharge purchased an entirely new rendering rig and has gotten it up and running / synced with our cloud over the past week. I took a more masochistic approach and redesigned my system I built earlier this year for GPU rendering. TK upgraded his current system with an additional high-end video card.
Upgrading hardware isn’t something I thought I’d need to do for a while after building a new rig earlier this year. The change to physically based rendering however means we are now using GPUs (graphics cards) for rendering as opposed to CPU (no worries, the monster CPU I bought early this year will be used for liquid and physics simulation in Maya). Naturally, this is the one thing I didn’t go all out on, so I took a couple days redesigning my rig by adding two GeForce GTX 1080 Tis. This should’ve been pretty simple, but due to the size of the cards I had to remove the M.2 drive I’m using for cloud syncing and replace it with a standard SSD to free up space on the motherboard. It took a couple of days to sync the new drive to our cloud, but I’m now back at 100% and rendering approximately 3.5 times faster. Ubercharge’s new system has a similar GPU setup, and will be a dramatic improvement over his old hardware. TK also added a GTX 1080 TI, so all of us now have dual GPU systems.
As good as this is, the new art style is exponentially more resource demanding than the old one, so there’s always room for improvement.
-------------
So, there we have it – congratulations if you made it through! You’re now all up to speed :D! Last but not least, I don’t have a date yet for V0.06, but there have been questions as to whether it will be this year. Obviously, getting things consistent for the new art style is taking some time, so the best I can say is we’re really trying. As always, thanks for your continued support, and I look forward to getting feedback from you on our progress!
- Eromancer
Destin Doragonzwei
2017-10-15 20:12:56 +0000 UTCMav
2017-10-14 14:53:11 +0000 UTCmyself yourself
2017-10-13 23:49:54 +0000 UTCdudman
2017-10-13 18:33:07 +0000 UTCGreent
2017-10-12 14:11:14 +0000 UTCJamie C.
2017-10-12 07:56:16 +0000 UTCtsukiouji
2017-10-12 07:49:59 +0000 UTCDrew
2017-10-12 07:20:47 +0000 UTCVerdonator
2017-10-12 04:04:29 +0000 UTCAltairPL
2017-10-11 15:47:24 +0000 UTCAntilles
2017-10-11 13:28:11 +0000 UTCAntilles
2017-10-11 13:25:06 +0000 UTCFredinator
2017-10-11 11:58:55 +0000 UTC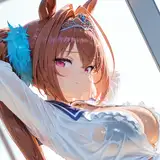


