Hey everyone, hope your December’s going good. I’m here with the December update.
First of all, thank all of you again for supporting me!
I’ve been taking it easier this December after spending so much time on the Richard Williams video this year. I got a lot work done on Patreon content and future YouTube videos this month, but haven’t finished anything yet. Up next is the first video editing article, which will be finished early in the New Year. I’ll be getting a new computer in January which will help massively (my current computer keeps freezing up on me in Premiere and After Effect). So I'm hoping to be able to produce content at a faster rate.
Over the past month I got a lot of writing done for my first article about video editing. You can read a sizeable chunk of it below. It’s about Key Moments and Storytelling and gives you a behind the scenes look at my Action Sakuga MAD. A lot of the writing is done for it, I just need to tidy it up and put it into a magazine format. It should be completed in January.
I’ve also done quite a lot of work on my first Editing Breakdown video about the Yoshitoshi Shinomiya Sakuga MAD.

Got any questions about my videos, the article below or anything else? Feel free to ask whatever in the comments of this post. I’ll be using the comment sections of my posts here as Q&A spaces for people who want creative advice or who just want to ask me questions about anything.
Here’s part of my upcoming article. The teaser below starts in the middle section of the finished article. I go into detail on the creative decisions I made in the Action Sakuga MAD.
I can't embed video links in Patreon Posts, but click you can click the hyperlinks to see the alternate edits I talk about below.

Creating a Draft
The Action Sakuga MAD is a weird case because the first song in it is a remix I made specifically to compliment my editing style. But like with every video I make, I began my edit by placing clips I thought could work in key places on the timeline first. Like a dot-point draft of a piece of writing. I call these initial edits Key Moments because they give me central ideas that I can work around. I use these Key Moments along with written notes to guide my edits as opposed to planning them out in detail beforehand. In the end I need to work with what I have. To judge the strength of my ideas and change them if needed.
The timeline of the Action Sakuga MAD initially looked something like this.

Click here to see what the video looked like at the start of the edit, with only the Key Moments
The hard part, what made this video take over 500 hours to edit, was connecting these key moments. Filling in the gaps. The creative work of building around ideas to make something cohesive is the most time consuming part of making any of my videos.
Key Moments
Here are the first 2 Key Moments I came up with at the start of making the Action Sakuga MAD

Key Moment 1 - Lighter Turning On
The first thing you see in the MAD. A close up of a character’s hand turning on a lighter. The edit stuck in my mind because of the synergy between the music and the visuals. The metallic ring in the song is reminiscent of the metallic hum a lighter makes when you flick it open. It makes the music feel diegetic - like it’s a sound effect in the scene.
The choice to use a shot like this at the beginning also echoes a common Japanese visual trope. Establishing shots are usually wide in Western media. We like to set up scenes with the camera pulled far back to give the viewer a literal overview of a scene. Japanese media traditionally does the opposite. Anime watchers will be familiar with scenes that begin in close-up. Rain pouring through a gutter, waves washing up on a shoreline or water upturning a Shishi Odoshi. This visual trope is related to something in Japanese Philosophy called the holographic paradigm (holo here meaning “whole”, graph meaning “inscribed”). The idea that the small aspects of an environment reveal a lot about the identity of the whole. Like DNA in a drop of blood.
So beginning with a close up, holographic, shot like this felt appropriate for a video about anime. The content of the shot is broadly revealing of the identity of the MAD as a whole. The fire sparkles to life through an impact frame - an animation technique you see many times in the video. The motion is smooth and mesmerising with subtle and overt details that can spur in the viewer a sense of wonder and appreciation for the artform. It has the classic sakuga feeling I try to inspire in the audience throughout the MAD. It does all of this without showing any explicit action. So the choice to use this shot at the beginning is reflective in some way of MAD as a whole.
A fire starting is also just a common visual trope to represent the something beginning.

Key Moment 2 - Action Reflected in an Eye
The edit works because it’s timed to the music and is a visual metaphor. It looks like you can see the action that’s about to start in the video in the character’s eye right before it comes onscreen. The lightning in his eye becomes more violent in time with the guitar riff, introducing a sense of speed to the otherwise slow and ponderous animation. Using the clip in this way adds anticipation for, and weight to, the beat drop.
Filling in the Gaps - How Key Moments Impact a MAD
I think the beginning of a MAD should be like the introduction in an essay. It should be a thesis statement - it should tell the viewer what they’re in for.
Like I went into before, the first key moment broadly echoes the feel of the whole MAD. It tells the viewer the video is going to have animation that fills them with a sense of wonder and that there’s going to be a synergy between the visuals and the music. That’s the main appeal of the video as a whole.
I also like to start abstract. Begin MADs with close ups of detail before bringing in the action. Teasing the action before showing it in full adds anticipation. It's why I like to use songs that begin with a build up, so the action can start in time with the song getting more intense. It creates synergy between the visuals and the music and gives the video a sense of progression.
The first 2 Key Moments are more abstract, holographic close ups of detail. You don’t see explicit action in either of them. Action is just implied. By keeping the action subdued in the part of the song before the beat drop you make the more intense action that comes in with the beat more impactful.
Beginning with intense action wouldn’t reflect what’s happening in the song, and would negatively impact the pacing. It would start intense and keep being intense. Not much build up and pay off and not very interesting, even if the edits are timed to the song.

Click here to see an alternate opening to the Action Sakuga MAD that uses more intense action
There can be interesting aspects to the editing seen in the link above. However, there are no overarching ideas behind this edit. Action cuts are just timed to the music without any sense of how they impact the feel of the video. The final cut of the Action Sakuga MAD is trying to have a specific effect on the audience and takes into account things like pacing, synergy, anticipation, salience and storytelling to enhance it. By doing more in a music video than timing things to the beat you can create something more memorable.
So when it came to filling in the gaps between these 2 Key Moments, I wanted to stay with the idea of holographic action.
I also like to prioritise flow in editing. I think flow is about making connections. I think about what the most salient parts of a shot are, i.e. what stands out to me. And I try to surround clips with others that have similar salient elements.
Salient elements I might notice can be:
Find 2 clips with similar salient features, put them next to each other and you'll feel a sense of continuity between them. The more salient features they share, and the closer those salient features are to each other, the greater the sense of flow. Flow can also be improved through editing techniques like match cuts and action matching (topics for future articles). This is why having a large library of visuals to choose from helps - you can make tighter and more specific connections.


By using complimentary salient features along with other editing techniques (e.g. invisible cuts, editing to the music, wipe cuts, match cuts etc.) you can make your edits feel almost invisible, like everything is flowing into each other without resistance. That’s the feel I go for in my videos.
Flow isn’t the only thing to keep in mind when editing, however. Connecting less salient elements, or making cuts that don’t flow (non-sequitur cuts) can be also be done for emphasis. More on this in later articles too.
So I’ve placed Key Moment 1 and Key Moment 2 on a timeline. What now?
I look for the most salient parts of each clip:
Key Moment 1
Key Moment 2
I start with Key Moment 1.
The most salient feature to me was the fire starting. This is what is literally happening in the shot so this is the idea that I wanted to expand on most for the greatest impact.
The problem - I didn’t have a good shot of fire getting larger when I started out. I didn’t know about the MHA shot that I used in the final cut when I started editing, I found it about a month later.
So after thinking about these salient elements, here are some of the drafts of the intro I came up with while editing:

Akira Explosion - Connected with something getting larger, bright light, light filling the screen
This edit mainly expands on the idea of something getting larger. The idea was: “the first Key Moment shows a fire starting. Following it up with the Akira explosion will make it feel like the fire/the action is getting larger and engulfing the screen”. It would reflect the sense of building action in the song and the visuals.
There’s a lot of issues with this edit though. It only works in a broad way. The only thing it really shared with Key Moment 1 was the light getting bigger. And that wasn’t the most salient aspect of the Key Moment. The Akira clip doesn’t involve fire and isn’t framed in the same way. So watching it back, it feels mostly disconnected from the lighter clip.
There also isn’t a connection between this and the 2nd Key Moment. I would’ve had to use another clip to bridge the gap, and I wasn’t able to find something that could do that convincingly.
This idea was scrapped pretty early on.

Macross Ad - Connected with light filling the screen, smooth feeling animation on 1s, bright light
This edit had the added bonus of the Macross clip having a similar feel to a lot of clips used in the rest of the MAD. The connection here wasn’t as strong as I would’ve liked though. Light filling the screen wasn’t really the most salient part of the 1st Key Moment or the Macross clip, so the connection felt weak regardless of how closely I timed the action of the plane to the song.
I’d also notably used the plane shots several times before in other videos I made and I wanted to do something new.
Using this clip here lead to me use different clips in between this and Key Moment 2. Playing off the ideas introduced in the Macross clip, I used a shot from Steamboy of a plane flying across a character’s eye. The flow of ideas between clips went something like this:
Lighter turning on, light filling screen > Light cascading across plane > Planes flying across blue sky > Planes flying across blue sky reflected in eye of onlooker > Action reflected in eye of onlooker
So these were some strong connections in this edit. But it felt off in other ways. It was too relaxing, too slow. Not the feeling I wanted at the beginning of an Action MAD. There was connection between all the clips, but the elements I was connecting weren’t as salient as I felt they could be.
So this edit was scrapped too.

Dragon Ball Broly - connected with close up of a hand, something getting larger, Shonen-style action and light filling the screen
This had a better connection than the Macross cut. The shot of the Kamehameha forming was framed in a very similar way to the lighter in the hand. The light of the Kamehameha getting larger also mirrored the fire starting and growing.
However the speed and the overall progression was an issue here. The Broly clip felt somewhat slower than the lighter shot. At this point in the video the song is speeding up and building up to the drop. But in the Broly clip the visuals appear to be slowing down, at least for a moment. I wanted something faster, or that had more of a feel of progression.
The light is also not filling the screen in a noticeably bigger way. It’s as if the light shown in the first clip has stayed the same size. The Kamehameha does light up the scene but there's still a fair amount of darkness. And the cool blue of the Broly visuals feels less intense than the fire in the Key Moment. The feeling of growth present in the song is not reflected as strongly in the visuals as I would have liked.
And, perhaps most importantly, the action in the Broly clip (and in the previous edits) is more explicit. It isn’t just a close up of action in the abstract, you see a character charging up an attack at another character. This takes away from the holographic aspects of Key Moments 1 and 2. By using the Broly clip here I’d be introducing intense action before going back into abstract action in Key Moment 2. It takes away from the impact of the intense action coming in on the beat drop.
So this edit was also scrapped.

Click here to watch the final cut
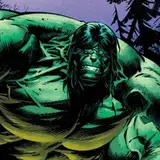
Final Cut: My Hero Acadamia - Connected with fire getting larger, action getting more intense but still subdued/abstract/holographic, light filling screen, Shonen-style action, 2000s era digital animation, close up of characters face, slow motion action
This was the most appropriate clip by far. The fire getting larger builds on the most salient part of the first clip - the fire starting. The action fills the screen, grows larger as the song progresses. Character’s faces are seen slowly fighting against the flow of the fire. Then a close up of a face is followed by a close up of the face in Key Moment 2. The framing in both clips is similar. It also helps that it’s from the same show as Key Moment 2. The flow of idea is so smooth here I think the editing is almost imperceptible.
The shots I used and the placement of the cuts was very carefully chosen. I went back and forth, changing the cut in points by a few frames at a time then back again to see the effect this had. The idea was to make the cuts more in sync with the song as the song progressed. Cuts in time with the music make a section feel more energetic so I wanted that feeling of energy to grow over time.
The final edit keeps the idea of abstract/holographic action intact. The edit gradually builds upon ideas introduced in previous clips to build anticipation for the action to come and give the beat drop more weight. It takes the most compelling ideas I liked about the first 2 Key Moments, preserves them and expands on them. I think the final cut of this intro section leaves an impression and gives the viewer a sense of what's in store for them in the rest of the MAD.
To be continued in the full article next month