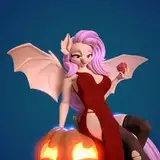
I've been trying to create a beautiful scene for the last two days, I can't say that I've created something cool, but what do you think?
In the print version, I plan to include a pony, two pillows and a round carpet that hangs from the edge. It will turn out to be a kind of figure that can be placed somewhere on the edge on a shelf near the wall.
A pony again! A book pony with a book by the window. It's rainy and dark outside, drops run down the glass, thunder rumbles somewhere in the distance and sometimes lightning flashes. Beautiful! Maybe.
Here are the print files as promised. Here I added two versions of the butt - with and without a cutiemark. Two versions of the head - with and without an iris. And two versions of the front hooves - with and without a chair mount.
The approximate height of the pony without a stand is 12 centimeters, the hole for attaching the tail is ~ 2 mm
Hyperactive Pinkie Pie or how many empty cups are there? I didn't count, She didn't either, I think.
The picture was inspired by art from zacatron94, or rather an edit from retroponybro.
The very first idea was related to Pinkie's "split personality", and the name for the future model was "congratulations, you have schizophrenia!". There should have been different pills and syringes around the pony. But I thought it was too cruel so I used a theme with coffee and a very active pony.
I do not know if patreon compresses images, so just in case I attached another image separately as a file, enjoy!
A little pony shouldn't have taken so much coffee in a vending machine!
And this time I won't do a bunch of renderings from all sides, but will focus on one, and this time a wide image! The first successful test render without lighting arrangement, effects and color correction. And also without bringing all the details to the end. Everything except the walls, pony and two chairs was taken from free asset libraries, otherwise why not, they are only needed for a beautiful picture.
I was inspired by one art with Pinkie in a nurse's uniform. I came up with a little change in the idea. To make it so that the form does not belong to her, she just took someone else's in the hospital, which will be hinted at by someone else's photo on the badge as well as Pinkie's strange behavior. Otherwise, why did she climb on the chair?
Another request is to mark the cutiemark somehow. I don't like the idea of making it convex. This is too noticeable on the figures. Making a special stencil that can be printed on a 3D printer is probably the best I've come to, but such a thing is difficult to print. And since it is almost always required to create several layers, it also becomes difficult to paint. So I thought that to do the same thing that I do with eyes - to make a contour. This should be slightly noticeable after printing and priming, but noticeable enough to draw a cutiemark. The recess also prevents the paint from spreading. I noticed this nice feature when I started making eyes in this way. This feature allows you to make the contour more accurately and prevent the liquid paint from spreading from the brush.
But with the cutiemark, this is still only a theory, in practice it is necessary to check whether this idea is good or not. So in the files there will be a version with such a cutie mark and just an "blank-flank" version.
This is such a built-in addon with bone rig presets for humans and some animals. Some time ago I started using it to more effectively select poses for anthro characters.
It's really not an easy task for me to find the perfect pose. With this thing, it became easier to twist hands, and it became possible to try more different options at a time, which is especially useful when working on commissions, when I do not know what will be better. Yes, it takes some time to set up, but it's worth it.
It's finally time to take up the pony! This should improve the anatomy, as well as the speed, because having a base that you can twist as you like is much easier to start and get to more detailed work on the characters faster!
A render with a circular camera span. Doing simple shading to demonstrate a color model is not interesting, so when I asked myself "how many effects should I add?" the answer was "yes". But at the 102 frame the blender decided to crash and it was not possible to do everything overnight
So the model has been prepared for printing! This is one of the options that I considered while working on the commission. I liked it and decided to make it separately. To attach the ball , I decided to put wristbands on her hands . This hides the seams and adds a few points to the sportiness of course! Speaking about the ball. Notice how neatly it in her hands covers some parts of her body, hehe)
There are several options for printing here, the difference is mainly in the set of clothes. The scale is ~ 27 centimeters in height, should fit into most medium-sized printers. It can be reduced, but it is necessary to take into account the thin parts.
So many versions of the model were presented that I decided to leave a couple of interesting versions especially for patrons! I'll finish it soon and post the print files here.
The biggest lesson I could learn from this: create a UV before posing, especially if several different positions are planned. Otherwise, you will have to color each version separately. Speaking of painting, I continue to improve the appearance of the characters, in my opinion the texture of the body looks much better!
Every time i have to go through so many versions of poses in order to find the best one. Not so long ago, I started adding a more complex rig for models. It turned out to be a very useful thing for finding a suitable position. But the process is still not fast, because the pose should suit not only me, but also the one who commissioned me to make this model. It will be necessary to try to do something similar for the selection of poses for ponies.
It's been a while since I've had a fox at work) At the same time, I watched "the bad guys" to better understand the topic. I really liked the mix of 2D and 3D, it looks very dynamic
I made some simplifications, baked a normal map and textures for the stand. It didn't work out very well with the texture, but it literally took forever to bake it, and I didn't really want to redo it. I also removed several levels of subdivisions for the body and dress, this does not affect the picture much, it is mainly necessary for a printed figure, where I will return this detailing.
I continue to work on this model. Now all kinds of jewelry have been added. I made bumps for details, in my opinion, with this golden pieces look more interesting. There are no renderers yet, since there are a lot of polygons, and my video card is falling off. There are only screenshots with tests of a translucent dress and a stone with inscriptions
Suddenly it turned out that it was impossible to repeat the pose as on the reference. Her gun intersects with literally everything possible.
It so happens that some thing looks good on 2D art, but it can't be done in 3D. Rather, it is possible, but it will look right and good only from one angle. Everything will be bad from other sides. So 7 versions were proposed with the condition of similarity to the reference. The option on the main photo was selected.
I really spent the whole day on this. It turns out that it's not so easy for such characters with such proportions and guns to find a suitable pose so as not to break her arms or something else. A very valuable lesson.
That feeling when it took me more time to create this gun than to create a body and a head... It is definitely necessary to study the hard surface in a blender. Interestingly, I started studying modeling with fusion 360 (the program where such accurate and smooth pieces are usually created)