C&T - Royal Preparation. Animation Breakdown
Added 2025-07-22 23:26:12 +0000 UTCHi.
It's time to break down another animation.
The last one I did was Ciri - Solo, I think? It was more a surface level overview of passes; I didn't actually explain anything in depth. This time, I want to do a balls deep version, meaning the post will most likely be available only for the Bite tier, as advertised. More on that later.
Also, keep in mind, I'm not a professional. I do things and I get results, but it's probably not the optimal way. And if I say something isn't working or technique looks questionable - it's most likely me problem.
Since Patreon in 2025 still don't let you embed videos on their site, we'll have to do this with worst possible format - gifs. This is actually hilarious, they would rather you upload a 200MB gif instead of 10MB mp4 )))
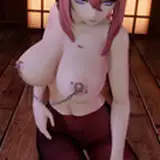
This is the final piece, lets break it down.
Passes
Blockout

I don't have much to say about this one. It was made without a reference, so I just posed them to get the general shapes and poses I have in my head.Blockout+

The second pass is usually just a polish of the previous one, where I insert additional key frames in between existing ones. It doesn't matter if it's animated on 5s, 10s, or 30s, I just insert new ones in the middle, to get a better feeling of the motion and doubling the overall key frames count.
Also, since Triss does the main motion/main actor, I polished her torso first.Blockout++

After adding key frames to Triss, it's time to add some for Ciri. She is reactive, so I did her second.
Looking at the final blockout I thought I was fine, it had good enough timing and overall movement was correct.
After adding keyframes to Triss, it was time to work on Ciri. Since she’s reactive in this scene, I polished her second. Looking at the final blockout, I thought it was fine, the timing and overall movement looked correct.Spline (Misery)

What can I say about this one?
So, I am not sure how I like to animate. Some say you need a really detailed blockout made with constant interpolation, spending most of your time on it, so you don't get shit like this when you convert it to spline. I tried both approaches, and what I like about going spline from the very start is that you can clearly see what you are getting. You can fix or change it right away. Constant interpolation often obfuscates errors you are making, and in the end, you may get something like I got.
I will try to do a more detailed blockout with constant interpolation for the next animation, to see if it will make a massive difference.Spline+

After converting it to spline, the first pass I do is just usually fixing the main errors and adjusting the timing, since now you can clearly see all the problems.
Some of you may know about "motion path" in Blender. For Armature, it can visualize the movement of a bone for you.
The problem is, if the rig has any complexity, you can't actually use it. Activating motion path made my UI freeze for 5 seconds after I make any adjustments. This is absolutely unacceptable. I don't want to hear or care for any of their devs' excuses. The same devs explained why you can't have more than 8 UV maps for a mesh. No no no no no, it's not like you can't make it happen, it's that you don't want to.
Developers would come up with 1000 excuses why it can't be done, just to do nothing/something else/keep chilling. And you know the funny thing about this? As soon as the boss comes in and says, "You’ve got time till Friday or you're fired" it suddenly becomes very easy and fast to implement. You can trust me on this one.
So, the solution is to make an empty, or something that will be parented to the bone you need to visualize. Path calculation for the constrained object was almost instant, and made it possible to continue polishing the curves.Spline++

Nothing new here, just continuing to polish both of them, mainly the controllers that have the most impact, such as the body and head for Triss, and hips for Ciri.Hands

When the bodies and legs are done, you can finally polish the hands. You do them after hips and bodies, so that you don't have to redo them if something changes about the legs.Face + Cock + Tits

Speedrunning some of the sections.
Then I do lesser details, such as face, cock, and tits. You really need the rest done before you can start to polish them, cause all of them really depend on the previous passes to avoid clipping and convey emotions.Thighs v1

Okay, here things get interesting.
The biggest problem with this piece was it's duration without any cuts.
-Ok, and?
It means that during the whole duration, you have hands, constantly applying pressure on thighs, without an easy option to reset the simulation. Constant pressure makes simulation very jittery, like a jelly, to the point where the thigh keeps shaking when it shouldn't.
The way I fixed it was this:
1. Do a cloth sim to get the biggest dents.
2. Smooth it with "smooth corrective" to stabilize a bit.
3. After you lost some details you bring them back using "dynamic paint" for smaller touches.
4. Bake cloth sim to a rig, so that you can adjust it if needed and smooth the simulation once more.
5. Use the adjusted/stabilized proxy mesh to deform your main one.
At the end, you'll get something like this. This one is without "dynamic paint" but the difference in jittering is massive.
THEN, you'll probably need to adjust the fingers once more, to remove some unwanted clipping.Thighs v2 + Hair

Here you can see how that worked out. I added some smaller dents adjusting the proxy rig and adjusted fingers once more.
Hair currently don't have any bones, they are simulated using a weight map for strands that need to be moving.
This is a bad option, it is slow, can't be controlled or adjusted. If you can't or don't want to spend much time on redoing the hair, this is a better way to make them move;
1. Create simple rectangular planes and put them over the strands that need to be moving.
2. Bind hair to strands.
3. Simulate planes.
This setup is much more performant and controllable.
Ofc you can do a similar thing using bones, simulating them instead.Balls

I felt like balls were clipping too much, so I put them through cloth sim to remove some of the clipping and enhance their movement.
They were done in 3 phases:
1. Manual animation.
2. Bones simulation.
3. Cloth simulation.
Biggest mistake (So far)
You might've noticed, up until the final version, there were 3 ending slides of Triss's boobs over Ciri's cock/thighs.
What happened is that I couldn't make it work. Because of an incorrect angle of their bodies, there was not enough space between her and Ciri. Having no place to go and, tits start clipping inside thighs, when the simulation was running. I managed to fix the first slide, but at that point it was clearly over.
The good this is - since I failed to make it work this time, I may try it again in the future. Hopefully with better results.
Rendering + Compositing
I like using DOF, but I find Z pass compositor approach very questionable; lets just say it like that.
It never works how I imagine it should and often leaves rough edges. It's much worse than DOF that you get from a camera as well. Not a fan of this approach.
I like to separate a foreground from a background using "view layers". Then you use a compositor to combine them. Having them separated, you can easily blur the background just they way you wanted. Also, it helps keeping rendering times as low as possible, since you can have different settings for your foreground and background. Background can be rendered using less samples and lower resolution and it won't be noticeable.

Post Production
I don't have anyone to do this for me, so it is done by me as well. Using Resolve, I add sound and do additional composition/color grading till it looks presentable. Even though most heavy composition is done in Blender, it still lacks many features you can get using Resolve such as grain or halation. I think you can make them yourself, but I'm not interested in that.
I think this is it, what else? I don't know.
If you have any questions you can ask them in the comments or write me directly.
One more thing
I think I fucked up rewards for different pledges. This post was a bit more detailed than the previous one, thus goes as a "Bite" tier reward. And I know you paid for the higher tier and deserve to get all of its bonuses.
But the question I have is: how many of you subscribed to a bigger tier solely to get its rewards vs simply doubling your support?
If you think that I'm pussyfooting around - that's exactly what I am doing.
Okay, let me finish the post with this:
What I'm trying to say is YES, it's a "Bite" reward, yes, I put it there myself. But would you mind if I shared this post with the rest of the supporters, so maybe it can help somebody?
Comments
Please make long (as much as possible) story driven videos.
Morpheus@dream
2025-07-24 14:03:46 +0000 UTCShare with whoever you want!
TheGreatCornholio
2025-07-23 09:23:56 +0000 UTC