Screen-space Surface Smoothing
Added 2024-01-15 07:00:04 +0000 UTCI'm back with another development update. Introducing Screen-space Surface Smoothing (SSSS) - a great feature of the real-time renderer with the best acronym.
What's this about?
A major difference between the real-time renderer and the raymarcher - apart from speed - is the visual smoothness of the surface. While the raymarcher maps the surface texture continuously, the real-time renderer is currently much simpler and simply textures each particle separately and independently from other particles, creating noticeable discontinuities in the rendered image. I wanted to improve the render quality while also keeping the current performance of the real-time renderer.
The solution is to apply the surface smoothing after the particles have been rendered to the image, or in "screen space". The smoothing filter therefore operates on pixels rather than on particles themselves, which is the case with the raymarcher. The results are surprisingly good: the video above shows a simple collision simulation with 50k particles. Despite low resolution, the surface looks smooth and comparable to the raymarched result.
To make it work, I had to substantially change the render pipeline.
Original render pipeline
In the current version (0.4), each particle has a number of attributes that are used by the renderer. These are mainly:
- Particle position
- Radius
- Surface normal (orientation) of the particle
- Temperature, used to determine the glow color
- Texturing coordinates (position of the particle inside the texture map of the object)
- Gradient of texturing coordinates (how texturing coordinates change around the particle)
- Index of the texture
Given these values as an input, the renderer works as follows:
1. Render each particle as a quad, the size of which corresponds to the projected radius of the particle. Discard pixels that fall outside of the particle circle.
2. Calculate the pixel depth based on the position of the pixel within the quad. This is used for depth testing and later for shading.
3. Calculate the texture coordinates of the pixel, using the texturing coordinates of the particle center and their gradient (assuming the coordinates change linearly).
4. Given the texture index and texturing coordinates, sample the corresponding surface texture to find the diffuse color of the surface.
5. Calculate the final color of the pixel. The pixel color is affected by the directional and ambient light, heat glows, shadows due to light occlusion by another object, etc.
6. Apply postprocessing, bloom effect, etc.
Because each particle is rendered separately, there is no continuity in the rendered image, particles simply look like "hard spheres" that overlap each other.
New render pipeline
The screen-space surface smoothing changes this by splitting the render pipeline into three parts - rendering auxiliary particle data, smoothing the data, and finally surface shading.
Here is how it works:
Steps 1 to 3 are the same as before.
4. Instead of sampling the texture and evaluating the pixel color directly, we only save several auxiliary values to the pixel. These are: texturing coordinates, texture index, particle screen radius, surface normal and emission color.
5. Now comes the trick: once all the pixels are rendered, the pipeline applies a "smart blur" to the intermediate buffers. Texturing coordinates, surface normals and the emission buffer are smoothed, averaging the values of neighboring pixels.
6. Using the smoothed buffer of texturing coordinates, the diffuse texture (and now also the specular and emission textures, see below) are sampled and used, together with the smooth normal and emission buffer, to determine the final color of the pixel.
7. The postprocessing step is also the same as before.
The smoothing filter removes the discontinuities, and because it's applied on the texturing coordinates instead of the textures directly, we still get a detailed textured surfaces of planets.
A great advantage of this approach is that it's completely independent of the number of particles or other simulation parameters. Since it operates in the screen space, it depends only on the render resolution.
A few things need to be done for the renderer to work properly. Mainly, it cannot apply the smoothing filter to all the neighboring pixels, doing so would create visual artifacts.
- It needs to only average pixels belonging to the same object, in order to avoid blurring completely different textures together. It also prevents the blurring of object boundaries. This is where the texture index comes in handy.
- Pixels should only be averaged if they are close in the 3D space. This is done by discarding pixels whose depths differ by more than a given limit.
- The filter has to be symmetric to prevent the surface from visually moving around the object boundary. This means that if a pixel p+dp is excluded due to the criteria above, pixel p-dp has to be excluded as well.
The second thing to consider is the filter radius. It has to be chosen carefully, depending on the projected particle radius and the surface normal. If the filter had a constant radius, the smoothing effect would differ depending on the distance from the camera, and if it was independent of the surface normal, the result would be different depending on the viewing angle.
The last thing to mention is the filter performance. The filter has to be separable to be fast on the GPU. However, our filter is not, due to the various criteria for neighbor selection. Nevertheless, we can still get away with the assumption that the filter is separable. The cost is minor visual artifacts - if you see small vertical/horizontal "streaks" in the image, this is why.
All things considered, SSSS significantly improves the render quality with little performance cost. Awesome, right?
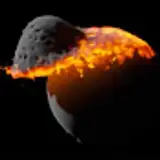
Comparison of a simple simulation with 10,000 particles, with SSSS disabled (top) and enabled (bottom). The difference is pretty clear.

Emission map is also smoothed to avoid sharp transitions of heated particles. It makes the resulting image look much more raymarcher-like.

While this is clearly a great change, there is still room for improvement. Despite the surface being smooth, the outline of the planet visibly shows individual particles. I have some ideas about what to do about that, we'll see if they work out in the future.
How is it different from the raymarcher?
The raymarcher renders the object's surface given by a zero level of a certain implicit function. First, it finds the intersection of the camera ray with one of the particle spheres, then looks for all particles within a kernel radius of the intersection position, and then "marches" along the ray, trying to find the minimum of the objective function. Once it does, it further uses the neighboring particles to calculate the texturing coordinates, surface normal and emission color of the shaded point.
Similarly, the real-time renderer now uses the smoothing step to make sure pixels can "talk to each other". However, while the raymarcher works completely in three dimensions and is therefore view-independent, the real-time renderer tries to cut a few corners by working only in the screen space. The SSSS approach is a bit less accurate and somewhat view-dependent - you might notice that the texture does not stick perfectly to the surface when moving the camera around, especially near the planetary poles. However, it's much faster than the raymarcher, because we don't have to deal with particles at all!
Additional texture maps
You probably noticed more changes in the screenshots above, namely specular reflections and city lights. These are additions to the renderer in the upcoming update 0.5. Previously, there was only the diffuse texture, which determines the color of the surface, now the objects can add other textures for extra customization.
- Specular map tells how reflective the surface is. It's useful for water rendering, making oceans more reflective than the continents.
- Emission map is a glow texture of the surface, it can be used to add lava, forest fires, etc. In the example below it's used to show the country borders.
- City lights is a texture similar to the emission map, but it only shows up on the night side of the planet.

That's it for now. Stay tuned for more updates!
Comments
ive joined but nothing changed
Naomi Johnson
2024-07-06 12:27:10 +0000 UTCYess I’ve wanted this for a while, since open sph has the smoothing
Space Sheb
2024-01-23 00:49:38 +0000 UTC


![カネコツ[kanesys]](https://xaiju.com/istorage/20926.jpg)