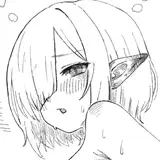
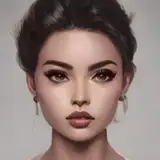
◗ Eye painting
Since it is not interesting to use examples or as is, I tried to draw the eye paint with a slightly different atmosphere from the examples and official illustrations.

I decided to go ahead with the body, as it looked fine when I tried to match it to the body. The only differences are the position of the eyelashes and the angle of the eyebrows...
but this alone can completely change the expression, so it's fun to try different things if you want to get away from the examples and the official pictures.

I also did a rough enamel one-shot drawing as practice.

From a distance it looks good, but up close it wants a little more precision.

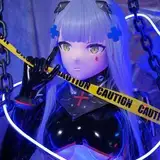
So, this is what happened in the end.

The slight yellow color on the face is evidence of a thick coat of clear. When I paint my skin, I use a mixture of Gaia's 059 and 060(slightly orange) as a primer for shadows, etc., and then use Modelkasten C-12 (pink) to create the skin tone, so the effect is that it saves me some time and effort in priming. So there is no negative effect whatsoever.
I could have left it as is, but I want a highlight above the eyeliner...so I'll paint that as well.

I have found that this kind of gradation can be done in one shot with brush dots, without using an airbrush, and I will make use of it in the future.
This way of painting is like stamping paint on the tip of a brush. It is easy to create natural gradations like the blurring technique.
When I do eye painting, I am always aware of where my gaze is looking and check to see if my pupils are in the wrong position. If the pupils are not in the right position, it tends to be strabismus. If I am not sure, I should stop working for a day before closing with a clear and check for any discomfort the next day.
It may be easier to confirm the position if you take a picture or compare it with the illustration to check for any discrepancies.
If there is no problem, mask off the eyes and apply in the order of skin tone, blush (cheeks), and lip (lips). Although it is not shown in the video, this time a light pink color is also applied near the inner corner of the eyes.
This is quite effective when you want to accentuate sexiness, so I would like to use this in the future.
The highlight on the eyeliner is also a bit darker. The pink to be applied on the diagonal line of the cheeks is applied thinly enough not to be too harsh.

This is roughly how it is done. Just making the lip glossy gives it a luxurious look, so don't forget to treat that part with a brush application.

After the eye painting is done, the rest is just a quick assembly and you are done.

When assembling, we glue the shafts of the parts together if we are not considering major maintenance or if we are delivering the product as a commissioned item. Recently, I try to glue and pack the parts well to prevent damage during transportation.
As for packing, we are completely disregarding the cost and fully utilizing urethane cushions, so there seems to have been no problem with the most recent delivery. We can't think of any other way to ensure safe transportation at any cost.
So, that's the end of this article on the production process.
Stay tuned for the next update!