![[Asuna Bunny wip 3] Color mixing and painting, eye painting process - to completion](https://img5.xaiju.com/storage/1/re/en/d38796-019e8e83-e0d4-7d0b-a6c4-0b43dceb9f92.jpg)

I had been thinking that I should finish the Asuna Bunny, but I had other things to do, and as a result of all the sanding I had been doing, I had put it off until I had finished it.
I had finished it, but I thought the expression was not good, so I decided to repaint it. Well, it's not what I was expecting! It is a common occurrence when you work with rubble, so it is nothing to worry about.
There is no end to the self-satisfaction in making rubble... It is not over until you get a look that you are satisfied with... So this time, I will tell you about the painting and eye painting process.
--------------------
After the surface preparation is finished, remove the mold release agent as usual. Recently, the entire surface is sanded thinly (this works best, even if it is tedious in the end) and then soaked in lacquer thinner for 5-6 minutes.

It is good to have multiple sizes of freezer bags (SML) so that you can use different sizes for different size parts. It is safe to double up the bag to prevent tearing and leave it in a Tupperware for further use.
After that, the usual procedure is to pull them out of the solvent, let them dry, and coat them with Finisher's Multi-Primer.
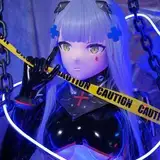
The key color for Bunny Asuna is decided to be blue-green (color code: around 0090A8), so the color will be mixed to look like that.

0090A8
I mixed emerald green, which I made for Coccoro-chan, with a blue that looks a bit like Gaia's ultra blue diluted with white.


If I add a little more green to this, it would be about 0090A8. I do not always refer to the color code, but only look at it occasionally. So my color mixing process is to roughly make a base color like this and then fine-tune it.
As Asna bunny uses a lot of this blue-green color, I made a little more.
Then, paint it.

This is fine since the original picture is this bright.,hahaha. Add shades (shadows) around the navel, wrinkles, vertical lines, and edges.
The shade color is made by mixing the blue-green color you just made with pure CMY mixed black (it is best to mix a little pure violet to remove the greenish look).
I don't use a ratio of ”○○ : △△", as other modelers often do, because it takes too much time and I forget how to do it.
The chairs, bow ties, and ribbons are painted in the same way. I think it's fine to paint the base blue-green as a solid color at first, and then add shadows on the edges later.
As usual, the skin is painted by first applying a thin coat of a mixture of Gaia's 059 and 060 and then applying a coat of C-12(モデルカステン 粘膜クリア) over it.
This method is easy to use and the skin tone is stable, so even if I have to repaint one part, I can reproduce the same color right away, so it is quite easy. Recently, pink skin tones have become mainstream, so I recommend this method because it matches the skin tones.

When I was painting Marsh and Kashima, I used to shake it orange and it was quite light in skin tone, but recently I have been trying to apply it much darker. This way, there is no weird white residue that looks like resin, so the final result is quite different.

I used to paint tights with a skin tone undercoat, but I realized that it didn't make much sense, so I don't do that anymore. But recently I have stopped doing so because I have realized that it is not so meaningful. It's okay to start with the base color!
I tried to make Bunny Asuna's tights about 20 to 30 denier this time. I used these three paints. From left to right, black for shade (CMY mix), pure magenta, and my own brown.

Apply the first coat of brown.

Then add a well-balanced application of shade black and magenta and add shading to make it look like that.

Is it like neutralizing the brown with magenta...


It is nicer to have the colors as close together as possible on the left and right feet.
The high heels are painted purple on the edges and pearl coated over the top, but well, you can't see anything yeah...

For the ears, first paint the edges with purple (a lavender-like color mixed with white).

For white, I sometimes use a blue shade color such as blue, and sometimes I use a purple color like this. In the case of Bunny Asuna, the key color is blue, so if I use blue shadows, the color will be assimilated and it will be hard to leave an impression. So I use purple.
The only way to get a sense of this is through experience, but for now, I think you can find a pattern by observing how the shadows are used in the finished PVC products and デコマス(finished samples).
After masking, put a light pink color on the top and bottom (edge) of the inside of the ears, and then add a slight ivory color in the center.

Why not just put pink at both ends? You might think, "But if the center remains white, it would be tasteless, so adding ivory (Gaia's GS-05) in the center would bring it all together nicely.

Finally, peel off the masking and assemble it, and if it is good, go to the next process.
By the way, the image below is an example of failure.

What is failing is that the masking width of the ears is not even and does not look clean. So this is repainted.
The repainted image below shows the obvious difference. It is better to pay attention to the width of the masking to get a more careful finish.

The most difficult part of color mixing is the hair. It looks like a light brown with some green in it, and it also looks like blonde...so I applied it in a messy way, just trying it out and settling on a color that felt right. I found out later that the color Sinai Gray is pretty close.
This is the final base color after various adjustments.

After applying this, I applied shade black to the edges and valleys to give it more body. It would be better to add some reddish color.
And I painted it like this.


I think the hair color gave a safe impression.
■ Chair pedestal painting
I used a ”bone mirror”(made by トアミル) for the base of the chair.
Here is the finished product.

If it cures well after topcoat, it will be a perfect mirror surface, but if there are tap marks or dust, 100% of them will show up, so if you fill holes, etc., those traces will show up. Like this.

There is nothing we can do about it, so let's give up!
Well, if you want a perfect mirror surface, don't make any drilling marks or anything like that. This is the only way. Also, if there are large flat areas like this, it is better to mix a reinforcing agent with the clear topcoat to make the surface hard.
Without a reinforcing agent, the paint surface is soft and scratches will easily show up.
■ Eye painting
The eye painting was difficult because the posture and gaze are almost fixed, so taking the gaze in a direction not intended by the modeling would cause discomfort. The body is facing to the right and the face to the left as seen from me.

As indicated by the red arrow, since the face is facing left, it would be more natural for Asuna's eyes to be in the same direction and pupils to be near her nose.
From a frontal angle, it looks fairly normal...

When viewed from the same angle as the original, the position of the pupils is not correct and the gaze is not stable.

It may be that I care too much about it, but it really bothered me, so I had to redo it.
I feel that the flexibility of eye painting is more restricted when the angle is fixed than I imagined....
So, I decided to repaint it once again, so I did a rough draft first, and it looked like this.

Bringing the pupils just close to the bangs will bring it closer to the atmosphere of the original painting.
This is the result of coloring in this state.

It looks good up close, but when I took a good photo of it, I could see the discomfort.

The lash line at the top of the eye was too thin, and the pupil highlights made the eyes look not good.
Therefore, I adjusted the eye line to be a little thicker and the pupil to be larger.

I think it has become milder and prettier. I am not 100% satisfied with the face, but I think I found a compromise.
I'm not sure if it was a bad idea to make it too closer official or what, but at least it's at a level where I can look at it, so I'm happy about that.I will prepare photos and videos of the finished product, but I think it will be a while before I get there, so please be patient~!
francivalter lima pereira
2022-09-19 19:52:14 +0000 UTC