![[Random Tips] How to repair parts damaged after painting or chipped paint and specific examples](https://img5.xaiju.com/storage/7/vk/hi/d38796-019e8e83-fb05-7011-854c-746fb5e02acd.jpg)

This is quite common, but it can happen when the painting is done and all that is left to do is to assemble! Just when you are about to finish the painting and the only thing left to do is assembly, a part is unexpectedly dropped and damaged....
I will tell you how to repair it in such a case. It is not difficult at all. If it is broken, you just need to attach it, polish the bumps, smooth it out, and repaint the part. If it chips, you just putty the part and repaint it...that's about it.
Well, I thought it would be easier to understand if I had a concrete example, so I summarized the repair method using a part that was damaged and has just been repaired as an example.
■Identification, repair, and shape repair of damaged (missing tip) areas

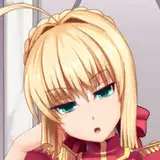
The first step is to check the damaged part. The damaged part this time is the tip of this hair. You can clearly see that it is shorter than the spare part.
If you look at it from the side, you can see the cross section...

The process required to repair such damage is as follows
・Repair of missing parts
・Painting
There are two types of repair: shave the broken part and make it sharp, or extend it and make it as close to the original shape as possible. In this case, we will try to get as close to the original shape as possible.
■Use resin runners to extend missing parts quickly
When restoring a missing part, I use resin runners for this kind of restoration because it takes time, although there is a method to restore the shape by applying epoxy putty through brass wire.
I keep a certain amount of resin runners in stock for use in such cases.

Find a shape that could be used in this area and glue it to the missing part.

It can be messy, but it will be easier in later processes if they are glued so that they face the same direction. If the missing part is thick, brass wire should be threaded through it, but since the missing part is only a few millimeters, we will skip this step.
First, cut the unnecessary part with nippers.

Once this is done, the shape is ground to shape using a router and sander.
■Shave, polish, check, paint, and check!!
Make a solitary area with a zirconia bit or smooth the convexity with an Altima or sponge file.


Once a certain amount of shape has been obtained, carefully polish the inwardly curled portion with a sponge file to a natural shape.

Once the shape has been formed to some extent, check for unevenness by spraying color surfacer and confirm the length of the extension. If there are no problems, apply color as is. If there is still some unevenness or the extension is too long, continue cutting and polishing.

The result of the shaping to a certain degree is as shown here.

This is the part after the repair is complete. Although the shape will not be exactly the same as the original part, it is difficult to notice the repair at a glance!

Check for problems from various angles just to be sure.


It appears that there is no problem. This level of restoration can be completed in 30 minutes to an hour, so there is no need to repaint the entire area.
■How to repair thick paint gouged out
The previous case was a tip defect. Then, here I will tell you what to do if it is not a defect but a partial paint peeling.
For example, if the thick paint film is gouged out like this, a large step will be created.

If this is repainted as is, the bumps will remain and will not look good. Therefore, it is necessary to fill in these bumps with putty to make the surface smooth before repainting.
The following materials come to mind as materials to be filled with putty.
・Epo Putty
・Instant adhesive (Cyanone)
However, it is troublesome to use Epo Putty for this level of step filling. When filling in with adhesives such as Cyanon, there is a risk that the solvent component in the adhesive will peel off the paint in other areas if it splashes out unexpectedly.
UV resin or UV putty can be used in such cases, as they do not contain solvent components and will not damage the paint when applied over the coating. They are also very easy to handle, as any splatter can be wiped off.
The UV resin is heaped and polished. Now that it is smooth, paint it the same color and finish. Pen-type UV lights are very useful for curing UV resin.

It looks like this. It is very easy and can be completed in about an hour. Of course, in some cases, it may be difficult to match colors. In such a case, simply repaint the entire surface.

Although it is a case-by-case basis, if the appropriate action is taken according to the situation, the restoration can be done quickly without wasting time.
There is absolutely no need to go to the trouble of removing all the paint and reapplying it in order to repair a small area.
SUKIMA SANGYO
2022-04-27 11:18:06 +0000 UTCJohan Setiabudi
2022-04-27 10:50:41 +0000 UTC