Tutorial - Floof
Added 2019-06-16 06:37:42 +0000 UTCHi guys! Here's my first attempt at a tutorial - It's been a while since I've made one, so I really hope it can be useful and can convey my process well! If I can do anything better next time, just let me know! Any and all feedback is welcomed and appreciated <3
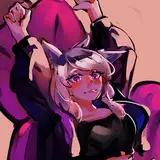
A lot of people tell me they love how I draw fluff and fur, so here's my attempt at explaining how I do it! I personally have a bad habit of covering up anatomy with fluff, but anatomy really has to be your basis for everything. Jenna is a good character for this tutorial because she has a lot of fluff, so the doodles will be of her body. She has that long arm and leg fur, so she happily volunteers! ❤
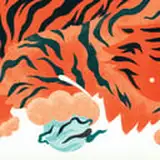
Before I show how to apply fluff to anatomy, I should probably show how I study it. All of my reference comes from photos and fluff is 100% no different. I found a couple of royalty-free fox tail photos to show:
(Please excuse the watermarks, while these images were available to download without watermarks for free, I wanted to make it blatant where they were from. If I have to cite photos again I'll do better next time!)
Take a lot of time to study these photos, and look at the direction the fur goes in, and how the individual strands of fur clump into tufts. It varies a lot from animal to animal - Dogs can have shorter, spikier fur and other animals can have silky human-like hair, but I found a fox tail a great medium to (attempt to) demonstrate with.

I group the chunks of hair into shapes that I see when I simplify each area. This is just my style of doing it though, and if you study from photos yourself, you will pick up your own unique method of rendering fur. I find that varying lengths and shapes really help, as well as remembering that fur has layers and isn't a flat object - For example, the tail is not just one outline. It has more layers of fur on the 'inside', and I feel it's better to look at fur as a 3D object than a 2D object.
For simple sketches, I will definitely stick to just the outline or just one additional layer of fur, but when painting fur or doing a lot of detail, I feel it better to emulate as many layers as the guide photo demonstrates.
--
It's also really useful to note where longer fluff goes on various animals. I keep using foxes, but they're really good examples of where the longer fluff typically ends up on many of the animals I draw. :D
Here's another royalty free image of a red fox, and some redline notes of its fur:

Do as many studies as you can! After you've learnt how fur lays on an animal, you can opt to make it toonier, more stylized, or more realistic... Whatever direction suits your own preference. ❤
I really love to do big neck ruffs, but remember - under all the fluff, there is still neck anatomy. It sounds really obvious, but it can be easy to forget when drawing a really fluffy species. It helps to define that before making anything really fluffy, just so your foundations are all laid down.
To add fluff over the anatomy, I'm using methods I made from studying the photos earlier. With your own studies, your own fur might look very different from mine, and that's what I love about studying photos. It leaves an opportunity for a unique take, which I feel is so much better than simply copying someone else's method.

When drawing longer hair, don't forget to take gravity into account too! Shorter, spikier tufts can support themselves and jut upwards on animals, but the longer hair will droop down.
I hope this makes sense and that you guys can make some use of it! Let me know if I can do anything better next time, if you have any requests for other tutorials, and so forth! Thank you so much ❤