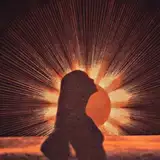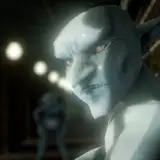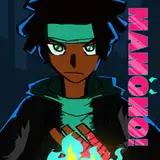
here's the process pack for december's monster of the month painting, featuring a northern lights monster. you can download the attached .zip below; it contains 20 pngs and 1 gif!
besides establishing the poses of their bodies, the sketch stage was important for figuring out the flowy posing of the veils and tail; since they are the centerpiece of the design i wanted them to be in focus in the painting as well. i actually re-did the lineart once, because the first time around the folds and creases of the veils just came out looking too sharp and stiff, not as smooth and organic-looking as i intended. i haaate having to re-draw linearts, but it's usually worth it.
as per usual, i started with adding the basic colour flats and some gradients. the largest portion of this process was spent on making the veils and tail look exactly like i wanted them to; the colouring of the monster's body and of the human is actually relatively simple and not as detailed or textured. again, the veils and tail are the most 'important' part of this picture, so that's where i chose to focus the detail and texture.
at first, it was basically like colouring fabric. i used the lasso select + airbrush method to add a dark blue gradient along the upper parts of each 'layer,' since i wanted the ribbons of aurora borealis to fade back into night sky blue towards the top. at this point i lowered the transparency of the lineart, set it to 'multiply,' and coloured the whole thing a medium green; although i changed the lineart colour of the bottom character back to a medium brown, since the green lines looked odd on them.
next i picked a somewhat brighter green and went over the 'hems' of each layer, again using the lasso select + airbrush technique and adding the colour in such a way as to build form and shape (which was further enhanced once i added even deeper shadows). i then utilised some photoshop magic to add variety and threedimensionality to the veils and tail; i created a new layer, airbrushed a pale bright green onto the 'tips' of the veils/tail, set that layer to 'overlay,' and adjusted the transparency. i made another new layer and used the same settings for it, but used a smaller brush to add smaller bright details, not least to the folds above the monster's shoulder. i also created several new layers, airbrushed a medium green to the darker and more shadowy parts of the veils/tail, and set those layers to either 'multiply' or 'overlay.' compare steps 07 and 09; the former looks relatively flat, the latter looks much more alive and has more form and depth.

i added the starry effect to the monster's body and to the folds of the veil (since, again, they're supposed to look like strips of northern lights fading into night sky). i coloured the crown and the bottom's clothes--i wanted the human to have a very warm colour scheme, although i also airbrushed some cold blue onto a new layer set to 'overlay,' to make them look more at home in the cold colour scheme and snowy environment of the picture. if i hadn't used that trick, the bottom character would have looked oddly out of tune with the colours of the rest of the picture. i used the lasso select + airbrush method to shade the human's skin and clothes and the monster's body--and then i moved on to the background.
i had already decided i wanted the background to be a dark, wintery, night-time landscape, but up until this point i had mostly worked against a white background, to ensure that the vibe and colours of the monster came out the same as it had on the concept sketch. for the background i added the basic colours to the sky and the snow, as well as a dark 'ribbon' across the middle of the picture, where the trees would fade into a dark shadowy mass. i used a starry brush to add stars and a few different pine tree brushes to add the forest. fun fact: 7-8 years ago i used to think that using brushes like that was "cheating," but now i've come to fully embrace them as a handy digital tool. sometimes i still love to paint each tree individually, but other times--like this time--it's so nice and convenient to be able to add a whole forest in a couple of minutes.
next step was to add details and to clean up, refine, and polish the whole thing. as i was doing this i went over the veils and tail one more time. i airbrushed another layer of bright green to the brightest parts of them, on a layer that was set to 'overlay' and with the transparency lowered until it looked good. but most importantly i added a thin ribbon of green light along the hem of each layer of veil or tail; for this i used a kind of soft, tilted brush and painted with it in the direction of each fold and crease. i set this layer to 'overlay,' too, and adjusted the transparency; as you can tell, the 'overlay' setting was particularly useful for achieving the northern lights effect.
i did some more polishing and detail-adding, and finally added the foreground elements. i used the tree brushes again and painted in some rocks; the details weren't very important, since i added a gaussian blur effect to the whole foreground layer, creating some field of depth. i added some blurry snowflakes too, some final details, adjusted the brightness/contrast, and voilà; the picture is finished.
// art + characters © me.