you can download the attached .zip below to access 14 pngs and 1 gif, showing the process for november's MOTM painting feat a withered flowers monster! you know, after uploading so many process packs containing 20+ images, it almost feels weird to upload one with "only" 14 steps. but as it turns out, the process for this painting was pretty straightforward.
the pose-establishing sketch is the same as always, but the lineart is quite different from most of my pieces as of late. in many of my recent process packs i have mentioned my current fondness for thin, precise, crisp lines--and while it still holds very true that i love the look of such linearts, i also suddenly felt like i needed a break from drawing them. the very thin linearts look Great but they are quite time-consuming and can occasionally be frustrating, because they require more precision. i wanted to do a type of lineart where i could draw more 'freely,' if that makes sense; a type of lineart where there would be less of a need for every single line and detail to be just so, and less of a need to paint within the lines.
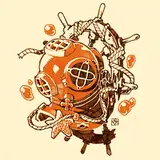
and so i turned to a set of brushes that imitate traditional ink brushes (you might remember the very first monster of the month i ever did--i think i used exactly the same brushes for that painting). they were perfect for drawing the bunches of flowers and leaves and twigs without having to worry about outlining every single little detail, especially since i knew i could (and would) add small details on top of the lineart layer later on. i also added deep shadows in a comic book type of style, especially where there was an overlap of body parts; the monster's crossed legs are almost entirely filled in with shadows, which serve to 'push them into the background' while also sort of 'framing' the non-shaded area which is in focus.
the background is quite basic and simply imitates old, yellowed, stained paper, in line with how the withered flowers monster has a Thing for all things old and weathered (as outlined in the design commentary). i finished it right away and then added the flat base colours to the characters. as for the colouring, this was all painted in the conventional way, as opposed to using the lasso select + airbrush method. i coloured in the bigger areas first, using different hues for different parts (grey for their driftwood limbs and face, a faded green for the leafy bits, a sort of yellow for the cape, pale hues of pink and yellow for the flowers). as already alluded to, i didn't have to worry about painting slightly outside the lines; this type of lineart allows for it, and i could clean it up a bit later on while adding details.

i worked on all parts of the picture pretty much at once, adding darker shadows and lighter highlights, aiming both to create form and make the picture easier to read. this type of lineart (and to some extent the monster design itself) is per default messier-looking than more thin-lined and precise linearts, and i admit that parts of my OC(P)D brain occasionally felt the urge to clean it up and make it look more Orderly, but i resisted. the whole point, after all, was to "allow" myself to paint something where i wouldn't "have" to concern myself as much with precision, detail, and orderliness. i gradually added smaller and smaller details, and the only time i used the lasso select + gradient tool was at step 09, where i added some shadows to a layer set to 'multiply' (and with the transparency lowered).
i coloured parts of the lineart, which (as per usual) makes a simultaneously big and subtle difference, but step 11 illustrates some photoshop magic that really transformed the whole picture. i moved on to working on layers on top of the lineart layer, added various yellow and rose hues to areas i wanted to 'pop,' and set those layers to 'overlay' or 'screen,' adjusting the transparency as needed. the lineart and colouring underneath still shines through, but the overlay effect really adds vibrancy and liveliness where applied. i kept working on top of the lineart as i added more details, and last but not least i flattened all layers into one and adjusted the brightness/levels.
// art + characters © me.