Hello guys!
In a recent poll on Discord, you chose "Color theory and lighting" as the topic you wanted me to discuss. Before delving into color, let's clarify some essential aspects of values (lighting). This is crucial because values essentially define colors, and it's helpful to understand a few key concepts to avoid becoming overwhelmed by color choices.
In the past, the challenge was finding information; now, information is abundant. The current challenge is selecting the best resources and options - "curation" - to improve your skills efficiently. While numerous resources detail how light interacts with 3D shapes and objects from various positions, this article will focus on three of my favorite lighting positions.
In simple terms, lighting involves comprehending 3D shapes and how light reflects on their surfaces. Rather than concentrating on countless ways light can be projected onto objects, consider the purpose of your creation and the role of lighting in highlighting those creations.
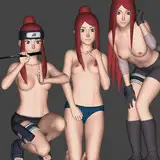
For this article, we won't delve into complex 3D shapes like characters, prop, or environment design. Instead, we'll use a basic body in a three-quarter view without clothing, props, or distractions. This perspective is more effective for showcasing 3D designs than a frontal or lateral view. In the images, the camera is positioned at chest height, avoiding top or down views. The character will face to your left.
Light Position One: Inside Light. This top-right lateral light is our "inside light." It aims to give a clear representation of the character design. Shadows cover less than 40% of the body, making it suitable for concept art or character design when clients need a clear view/read of the concept. Be cautious not to create overly dark shadows.
Light Position Two: Outside Light. This is also a top lateral light, but on the left side. If moved further behind the character, it can become a rim light. In this case, the light should be more towards the front, allowing viewers to understand the design while some 3D shapes cast shadows, making the visuals more engaging. For instance, the nose casts a shadow on the right cheek. This light position is ideal for both concept art and illustrations. In illustration, it's not just about showcasing design, but also capturing mood and composition through lighting. While concept art focuses on presenting a design idea, illustration aims to depict a moment. By making interesting lighting choices, you can create a more immersive experience for the viewer, truly bringing the moment to life.
Light Position Three: Backlight. This light is a top lateral light on the right side, positioned slightly behind the character. It's less common, as the shadow often covers more than 50% of the character, making the design harder to decipher. However, not all objects cast shadows with the same darkness; for example, skin typically creates lighter shadows than black objects like leather. Grasping the texture you're rendering will help you work with this challenging lighting position. This light is frequently seen in illustrations and even cinematic productions like animation or movies in which character are constantly moving and the light is focused more towards momentum/mood than design presentation. I enjoy this lighting because it is unconventional.
Bonus Tip!
I understand that figuring out where to place shadows can be overwhelming. To make it easier, start with a simple approach and adjust the shadows as you progress. Here's a straightforward video demonstrating my initial shadowing method:
1. Begin by positioning the light source.
2. Use a solid brush for a single stroke.
3. Gradually refine the shadow's shape on the object.
This process will help you build confidence in creating effective shadows and enhance your overall lighting technique.
https://youtu.be/Wg-azrnRwBc
Bear in mind that some lights and shadows in my work may not be entirely accurate, as I often experiment with shadowing. Occasionally, values might not behave as in real life, but as long as 80% of the shading/lighting is accurate, I don't stress over it. Good lighting lays the foundation for colors, as colors behave differently depending on the lighting position and the texture of the objects you're rendering. I would explore various textures and values in the next post, so stay tuned.
Please let me know if this explanation helps you grasp my approach to lighting, and feel free to ask any questions!
If you're new here, welcome! Message me via DMs or Discord if you have any questions. I usually reply within 24 hours.
For more information, check out our Patreon FAQ: https://ramonn90.myportfolio.com/faq and Patreon Catalogue: https://ramonn90.myportfolio.com/work
Have a great weekend everyone!.
Ramon Nuñez
2023-04-15 07:44:02 +0000 UTCCharles 7174
2023-04-14 21:52:08 +0000 UTCRamon Nuñez
2023-04-14 17:29:10 +0000 UTCCharles 7174
2023-04-14 17:23:34 +0000 UTC