Summary of the selection tools. Again, this is for sai but is similar across many programs. Warning, it's a bit of a read! *Note, the dotted line borders of selections are called "ants."
1) Square Selection: does what the name says - creates square selections. Click and drag to make selections. Hold down left shift while dragging to add multiple selections. Hold down alt to subtract from current selections. Can be used with the other selection tool options.
If you click and drag to make a selection, and click and drag again without holding alt or left shift, you will create a new square selection and the previous selection will be deselected. To deselect any current selection, just click anywhere outside of the selection or the selection erase button next to the undo button at the top left of the window (looks like the square selection tool with an eraser on top).
2) Lasso Selection: allows you to freely draw your selection. Uses the same hotkeys as square selection. Very useful if you want to select a specific spot or just quickly draw out a selection zone.
When drawing your selection, be sure to close the start point with your end point. Releasing your cursor without connecting the points will make the selection connect itself automatically with a straight line between the start and end.
3) Magic Wand: my most used tool, it's great for quickly selecting specific parts of an image. Sai does not have the most precise magic wand but it does the job.
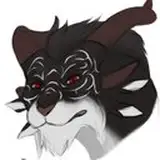
A) Here we have line art of a face. Using the wand, you can select anywhere outside of the face and the selection will turn blue, showing you everywhere the wand is grabbing. Using the fill bucket, you can color in that selection quickly. However, here I put a layer underneath the line art and filled that layer instead so the line art stays untouched. If you fill bucket the line art layer, the color will seep into the line art, up to the ants.
B) Here is the same face but this time, I selected the inside of the face and filled in color beneath the line art as before. This is to demonstrate that depending on where you select, you will grab different parts of the picture. So long as there is a significant difference in the selections (such as the line art separating the outside from in), you will grab different portions.
*Note: all selection tools can use invert selection which is under the selection tab at the top or ctrl i for some programs. You can also hotkey this yourself.
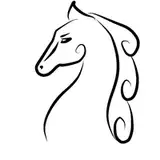
In the last section with the dragon head, I show how the wand will grab anything within the boundaries of a section. Below in the 2nd head, as soon as there are holes in the line art, it will seep into the rest of the neck. So be aware of what holes you leave in your line art! Holes are not necessarily bad but if say you didn't want to grab the outside of your line art, then make sure everything is closed off.
To the top right, we see the tolerance settings for the wand tool.
Transparency (strict): the wand will select portions of an image, either the image itself such as line art or the transparent portions not part of the image such as the background seen in part A. Strict causes the selection to meet any borders and stop immediately.
Transparency (fuzzy): same as the strict setting except the selection will slightly bleed and overlap borders. I do not use this setting personally.
Color Difference: the wand will select between differences in color. For example, if you have a tiger stripes in black and orange, the wand will only grab orange if you click on the orange portions. However this is where the transparency difference slider right underneath color difference is used. The slider is how tolerant the wand will be.
Lower tolerance means it will grab very specific portions such as just the orange parts. Higher tolerance means it will grab anything similar and even higher tolerance will grab everything such as both the black and orange parts. Lower tolerance = grab specific parts; high tolerance = grab everything in general.
This slider can be used with the other wand selection options such as strict and fuzzy. Lower tolerance is best if you have very thin line art that the wand finds it difficult to grab. High tolerance might end up grabbing the background too.