Hi guys, I trust you are all doing well.
Things are good here, work continues as normal.
I'm sure you're all wondering how long until the next update, I'm getting closer but there is still a ways to go yet.
I'm about to start working on the "main event" as it were, with Karen, Nikki and Haley. For every extra character in a scene it takes longer to make because of the extra posing required, so It's slower going.
I've also still got a scene with Dr. Williams and Officer Juru to do as well, I want all the girls to have an animation each too, so that's 5 more animations to create. So yeah, still a fair bit to do yet. I don't dare estimate how long it's going to take. You'll know when I know :)
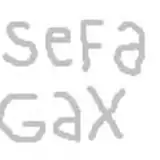
Following on from last week I thought I would talk about Daz studio render settings again. This time specifically the tone mapping tab.
So these are the settings I used for the above render.

Tone mapping is needed because otherwise Iray will output the raw luminance of each pixel. This is bad because Iray is a physically based renderer, the raw values will have a much higher dynamic range than our displays. To quote Wikipedia " Tone mapping addresses the problem of strong contrast reduction from the scene radiance to the displayable range while preserving the image details and color appearance important to appreciate the original scene content. "
A lot of these settings you don't really need to adjust. I'll just go over the main ones.
Tone mapping is a post process, It should not effect render performance at all.
The Exposure Value basically changes how bright the output will be. If your scene is too dark you can just lower this to make the image brighter, or increase to make darker.
Shutter Speed, F/Stop and Film ISO do not need to be touched unless you are trying to recreate with specific real world camera settings. All they basically do is just change the above exposure value. They do not give the other effects you would expect on a real world camera such as motion blur, depth of field or noise.
Burn highlights per component. This only it tends to desaturate the image so I leave it off.
Burn highlights and Crush blacks effect how the darkest and brightest parts of the image are mapped to the output. The higher the values the more they are compressed, Dark greys become black and bright greys become white. I find 0.1 a good balance. The output doesn't look too flat and I can always adjust it more in post if I want. If it's set too high, detail in the bright and dark areas can be lost that you can't get back in post.
And that's about it.
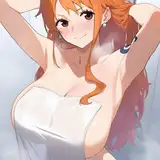
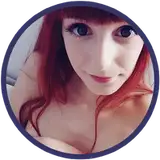
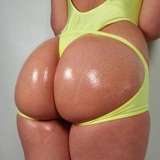
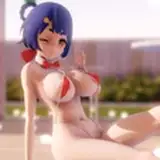
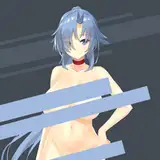
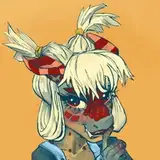
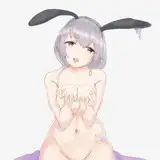
In this week's commission our patron wanted to see Nikki in VR. That's fine by me but as I know not everyone can view VR images and did some normal ones too.


I think these turned out well, I hope you all enjoy them.
I'll attach the VR versions below for those who can view them.
And that's all I have for you for now.
Thank you all as always and take care.
Weirdguy
2020-06-30 06:07:53 +0000 UTCWeirdguy
2020-06-29 15:54:56 +0000 UTCAlberto Martinez
2020-06-27 21:04:52 +0000 UTCStiglet
2020-06-25 18:26:08 +0000 UTCStiglet
2020-06-25 18:24:27 +0000 UTCAlberto Martinez
2020-06-25 15:03:27 +0000 UTCToridan
2020-06-25 13:59:25 +0000 UTCWeirdguy
2020-06-25 09:13:07 +0000 UTCJV
2020-06-25 04:39:04 +0000 UTCBlueno
2020-06-25 04:29:59 +0000 UTCErik Wastel
2020-06-25 01:28:10 +0000 UTCGray Metal Fox
2020-06-25 00:52:56 +0000 UTCCommanderCipher
2020-06-25 00:36:10 +0000 UTCTarakis
2020-06-25 00:08:48 +0000 UTC