Here's the process for yesterday's thank you drawing! It's just the process from beginning to end, slightly sped up, no audio.
For those who want to know more about the steps in the process, here's some more info about how I handle each phase of the drawing:
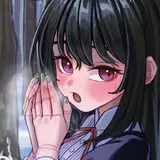
1. SKETCH
In the beginning, I just want to keep it loose and free! If I get hung up on the details at this stage, I tend to feel stuck, so I’m just doing some quick loose sketches using simple shapes. For this one, you can see that I tried out a few different sketches before landing on the final one. The brush I used for this sketching phase is called Macalabs sketch HB pencil, which is great for mimicking a pencil effect. You can find it here as part of a set: http://cbr.sh/fg8up?ref=loish
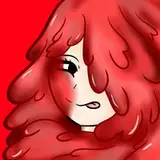
2. BASE COLOR
I merge together the rough and detailed sketch, because I hate throwing away those first sketch lines. I feel like they have so much personality. Then, in a layer below, I throw a base color down. I usually start with a totally random color and just kind of wing it from there. I feel like you need to see the colors in front of you to know what works, so I slap on some colors and then use color editing tools to tweak them until they ‘feel’ right.
3. CHANGE LINE COLOR
I set the line color to multiply and then change it to some color other than black. This way, it creates some new colors and interacts with the colors below in an intresting way! It’s usually that blending of bright lines with the colors below that allows me to find new and intersting color combinations.
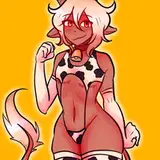
4. MERGE & DETAIL
I then merge the layers together (sketch lines and base color) and just start painting from there. I use the simple hard round brush which you can find with most versions of photoshop and also in my free brush set: https://cubebrush.co/loish?product_id=4jk2jw
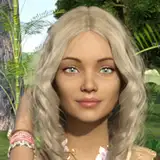
As you can see, the character started out really cartoony and I gradually add more and more detail as I go. This is why my art has a ‘semi realistic’ look: the construction is cartoony and the rendering is a bit more realistic!
MAIN TOOLS / TECHNIQUES:
1. Alt + click - this is the eyedropper shortcut in Windows / Photoshop and it allows me to ‘sculpt with color.’ Basically I focus on getting a nice color combination early on, and after that all I have to do is render and detail it using the colors that are already there!
2. Working from one layer - You can see that I have many layers but that I’m usually working on only one at a time. The other layers are all just older versions of the drawing that I keep there as a backup. Working on one layer keeps things simple for me, otherwise I’ll get lost in all the different layers and have a hard time making the drawing feel like a unified whole.
If you guys have any questions, please let me know! I can try to answer them and also take then into account for future videos / posts :)
John Cebollero
2020-08-15 03:45:09 +0000 UTCChloe
2020-01-17 09:59:55 +0000 UTCLoish
2020-01-16 09:44:27 +0000 UTCGreg Schultz
2020-01-15 18:21:40 +0000 UTCLEBuwu
2020-01-14 08:54:14 +0000 UTCMonika Kucharska
2020-01-12 21:05:07 +0000 UTCAshley
2020-01-12 14:56:28 +0000 UTCChristina
2020-01-11 20:42:07 +0000 UTCLEBuwu
2020-01-09 19:56:57 +0000 UTCAtılay Sargın
2020-01-09 18:58:03 +0000 UTCJeremiah Justice
2020-01-09 16:25:03 +0000 UTCMonika Kucharska
2020-01-09 15:54:20 +0000 UTCAnna Aldüz
2020-01-09 13:54:29 +0000 UTCLoish
2020-01-09 10:23:37 +0000 UTCLoish
2020-01-09 10:22:06 +0000 UTCBiiaboo
2020-01-09 01:30:05 +0000 UTCEvie
2020-01-09 00:41:36 +0000 UTCArtie Parker
2020-01-08 23:53:35 +0000 UTCDivi (Lovewin)
2020-01-08 17:16:43 +0000 UTCSarah cole
2020-01-08 16:43:10 +0000 UTCMichele
2020-01-08 16:42:03 +0000 UTCLoish
2020-01-08 16:30:22 +0000 UTCNic
2020-01-08 15:02:55 +0000 UTCTheeio
2020-01-08 14:53:49 +0000 UTCappleminte
2020-01-08 14:45:31 +0000 UTCcherooshi
2020-01-08 14:44:07 +0000 UTCLoish
2020-01-08 14:28:57 +0000 UTCHannah England
2020-01-08 14:25:26 +0000 UTC