дёҖз§ҚеҗҲжҲҗе·ҘдҪңжөҒ / A Workflow for Composition
Added 2023-05-17 09:48:14 +0000 UTCEnglish version is in the second half of the article.
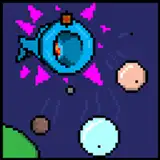
е…Ҳж”ҫж•Ҳжһң / First, let's see the resultпјҡ

жҲ‘иҮӘе·ұдёӘдәәе№іж—¶еҮәеӣҫеҹәжң¬дёҠжҳҜж–Үз”ҹеӣҫпјҲеҸ еҠ е·ЁеӨ§еЁҳжЁЎеһӢ/ControlNetпјүзӣҙжҺҘеҮәеӣҫпјҢеҶҚеҒҡеұҖйғЁдҝ®еӨҚ/й«ҳжё…дҝ®еӨҚпјҢдҪҶжҳҜеҜ№дәҺдёҖдәӣзү№е®ҡзҡ„дә’еҠЁеҫҲйҡҸжңәгҖӮ
еҗҜеҸ‘пјҡеңЁ arca дёҠзңӢеҲ°зҡ„дёҖдёӘеӨ§дҪ¬зҡ„ AI еӣҫпјҢзҢңжөӢиҮіе°‘жҳҜдёӨжӯҘеҗҲжҲҗпјҲж–Үз”ҹеӣҫ + еӣҫз”ҹеӣҫ/еұҖйғЁйҮҚз»ҳпјү+ (PS жүӢдҝ®? еҶҚй…ҚеҗҲ AI еҸҚеӨҚ)гҖӮдјҳзӮ№жҳҜжҜ”иҫғеҸҜжҺ§пјҢиғҪеҒҡеҲ°еҫҲеҘҪзҡ„дә’еҠЁж•ҲжһңпјҢзјәзӮ№е°ұжҳҜеҫҲиҠұж—¶й—ҙеҫҲйә»зғҰпјҲ笑пјүгҖӮ
йҰ–е…ҲеҮәдәәзү©пјҲеә•жЁЎзӣҙжҺҘеҮәпјүпјҢдёҚз”ЁеҸ еҠ е·ЁеӨ§еЁҳзҡ„жЁЎеһӢпјҲеҸӮж•°еҸҜд»ҘзӣҙжҺҘдёӢиҪҪеҺҹеӣҫжҹҘзңӢпјҢи§Ғ FAQпјүпјҡ жҺҘдёӢжқҘе…Ҳз”ЁеұҖйғЁйҮҚз»ҳеҮәеӨ©з©әиғҢжҷҜпјҢеҺҹзҗҶеҫҲз®ҖеҚ•пјҢз”»дёӘйҒ®зҪ©жҠҠдәәзү©е’ҢдёҠеҚҠйғЁеҲҶзҪ©дҪҸпјҢ然еҗҺжҸҗзӨәиҜҚз»ҷеӨ©з©әе’Ңдә‘пјҲејәеәҰжӢүй«ҳпјүгҖӮ
дёәд»Җд№ҲдёҚзӣҙжҺҘйҮҚз»ҳиғҢжҷҜпјҹзӣҙжҺҘйҮҚз»ҳе®№жҳ“жҠҠдёҠеҚҠйғЁеҲҶд№ҹз”»еҮәеҹҺеёӮжқҘпјҢжүҖд»Ҙе…ҲжҠҠдёҠеҚҠйғЁеҲҶйҮҚз»ҳжҲҗеӨ©з©әгҖӮ иҝҷдёӘжҳҜйҒ®зҪ©пјҲдҪҝз”Ё GitHub - continue-revolution/sd-webui-segment-anything: Segment Anything for Stable Diffusion WebUI жҸ’件з”ҹжҲҗпјҢжҸҗй«ҳж•ҲзҺҮе…Қеҫ—жүӢеҠЁеңЁ PS йҮҢз”»пјүгҖӮ
 еҗҢзҗҶжҺҘдёӢжқҘе°ұжҳҜз”»дёӢеҚҠйғЁеҲҶзҡ„йҒ®зҪ©пјҢ然еҗҺеұҖйғЁйҮҚз»ҳдёӢеҚҠйғЁеҲҶпјҢиҝҷдёӘж—¶еҖҷеҸҜд»ҘйҖүжӢ©дҪҝз”Ёе·ЁеӨ§еЁҳжЁЎеһӢжқҘиҫ…еҠ©еҮәеҹҺеёӮпјҢжҲ–иҖ…з”ЁдёҖеј еҹҺеёӮзҡ„еӣҫзүҮж”ҫиҝӣ ControlNet з”Ё Reference Only йў„еӨ„зҗҶеҷЁгҖӮ
йҷӨжӯӨд№ӢеӨ–пјҢиҝҳжғіеҒҡеҲ°жҲҝеұӢжҸ’е…Ҙзҡ„ж•ҲжһңпјҢеҸҜд»Ҙз”Ё ControlNet иҜӯд№үеҲҶеүІжЁЎеһӢжқҘиҫ…еҠ© (seg)пјҢеңЁжғіиҰҒзҡ„ең°ж–№з”»дёҖдёӘеӨ§еҺҰпјҲдёӢеӣҫзҡ„зҒ°иүІиүІеқ—пјүгҖӮ жңҖеҗҺеҸҜд»ҘеҶҚдҝ®дёҖдёӢдёҚж»Ўж„Ҹзҡ„з»ҶиҠӮжҲ–иҖ…зӣҙжҺҘй«ҳжё…дҝ®еӨҚеҮәеӣҫдәҶгҖӮ
--------------------- English Version ---------------------------
Personally, when I create images, I usually use txt2img (together with a giantess model or using ControlNet) to generate the initial image, and then I perform some repairs or high-res fix. However, for certain specific interactions, it tend to be very random and difficult.
Inspiration: I saw an amazing AI image on arca. I speculate that it is a composite of at least two steps (txt2img + img2img/inpainting) combined with manual editing in Photoshop and iterative AI processing. The advantage is that it offers better control and can achieve impressive interactive effects. However, the downside is that it is time-consuming and can be quite cumbersome.
First, generate the character (directly output using the base model) without using a giantess model (parameters can be viewed by downloading the original image, see FAQ).Next, use inpainting to paint the sky background. The principle is simple: create a mask to cover the character and the upper part, and then provide prompts for the sky and clouds (increase the intensity).
Why not directly inpaint the background? Directly inpainting can easily result in painting the city in the upper half as well. That's why I first inpaint the upper half to resemble the sky.The above is the mask (using GitHub - continue-revolution/sd-webui-segment-anything: Segment Anything for Stable Diffusion WebUI plugin to generate, which can increase efficiency instead of creating mask manually in Photoshop).
Similarly, the next step is to create a mask for the lower half and then perform inpainting on it. At this point, you can choose to use a giantess model to assist in generating the city, or use an actual city image and process it with ControlNet using the "Reference Only" preprocessor.
In addition to that, I also want to achieve the effect of inserting buildings. This can be assisted by using the ControlNet semantic segmentation model (seg). Simply draw a building in the desired location (represented by the gray block in the image below).Finally, you can make further adjustments to unsatisfactory details or directly perform high-res fix to finalize the image.