XaiJu
tsuhonki

tsuhonki

patreon


tsuhonki posts

Kisaki

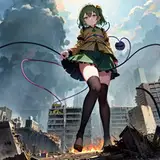
1, blender (render img) + tile -> initial img
2. inpainting + tile + Kisaki LoRA -> change character
3. (inpainting + PS) x N -> cloud and plane under feet
4. i2i + tile + detail tweaker LoRA -> filter and add some details
5. upscale
6. PS -> adjust color and shadow + depth of field

View Post

GAP-mix v0.3 融合模型 CHECKPOINT MERGE

融合模型,大部分为二次元模型,融合有少量 2.5D 和真实感模型。对雪糕、袜、裸足、低视角有一定的特化。

Merged model, with some specification for thighhighs, socks, barefoot, low angle. Most merged models are anime models.

下载链接 Download link: https://civitai.com/models/98418

View Post

巨大恶魔姐妹 Giant Devil Sisters

View Post

Kisaki 制作流程 / creating process

首先,通过文生图生成一张图,具体参数可以下载原图查看
First, generate an image using txt2img. Please download the original image to view specific parameters.

所用到的两个 LoRA 模型可以在 civitai 上下载,Lyco 模型为别人的私模,由于作者不允许外传,故不能放在这。
The two LoRA models used can be downloaded from Civitai. However, the Lyco model is a private model and the author does not permit its distribution, so it cannot be provided here.
Sitcrossleg (legs/shoes concept/helper) - 2.0 | Stable Diffusion LoRA | Civitai
Kisaki | キサキ (Blue Archive) - v1.0 | Stable Diffusion LoRA | Civitai

接下来找一张角度类似的脚的照片,用 PS 抠图并替换上图中的脚。
Next, find a photo of a foot with a similar angle, use Photoshop to cut out the image, and replace the foot in the previous picture.

然后局部重绘脚部,重绘幅度 0.5 左右,同时启用 ControlNet tile
Then perform inpainting on the foot, with a denoise strength of around 0.5, enabling the ControlNet tile.

接下来通过局部重绘合成缩小城市,选择仅蒙版。用两个模型
<lyco:miniature_V1:0.8>, <lora:jvdaniang_v15:0.4>
Next, use inpainting to create city, selecting only masked. Use 2 models: <lyco:miniature_V1:0.8>, <lora:jvdaniang_v15:0.4>

Miniature world style 微缩世界风格 - V1.0 | Stable Diffusion LyCORIS | Civitai

然后再多次局部重绘直到城市看起来足够的小
Then repeat the inpainting process multiple times until the city appears small enough.

最后以很低的重绘幅度如 0.3 左右配合 ControlNet tile 整体跑一遍图生图,使得城市以及经过 PS 后的脚与场景整体融合在一起,然后再高清放大即得到了最终的图片。
Finally, run img2img process with a very low denoise strength, around 0.3, combined with ControlNet tile. This will ensure that the city, along with the foot modified in Photoshop, seamlessly blends with the overall scene. Afterward, you can apply upscaling to obtain the final image.

View Post

Kisaki

Test the stability when mixing with other models.

测一下和其它模型混合的稳定性

txt2img (2 LoRA + 1 LyCORIS) -> inpainting (1 LoRA + 2 LyCORIS) -> tile + img2img (1 LoRA) -> upscale

View Post

巨大魅魔 Giantess Succubus

View Post

乱融模型弄出来的 / The result of randomly merging checkpoints

MBW 乱融模型,本来是想融个雪糕特化进去,结果意外的出了裸足...

Randomly merge checkpoints with MBW, which was originally intended to incorporate a model for white socks, but unexpectedly ended up with bare feet...

View Post

克拉拉

View Post

突然变得巨大的猫猫 / A catgirl who suddenly become huge

View Post

利用 ControlNet Reference Only 保留人设 / Preserve character design using ControlNet Reference Only

比如,我们先做出了这样一张图 / For example, if we first make a image like this

我们想保留这样的人设做另外一张图,直接把这张图放进 ControlNet 选 Reference Only 预处理器,权重调到 1

We want to preserve this character design and create another image. We can directly input this image into ControlNet, select the "Reference Only" preprocessor, and set the weight to 1.

可以看到人物形象基本上就保持了一致,当然提示词不要产生矛盾

As you can see, the character design has been kept consistent. However, please make sure that the prompts do not generate any contradictions.

View Post

尝试用 AI 识图配文 / Attempt to use AI to recognize the image and then add some texts.

图中配的文章为 AI 生成,通过 Visual GLM 识别图片,然后使用 GPT 生成文章。
The text accompanying the image is AI-generated. The image is recognized using Visual GLM, and then text is generated using GPT.
画像に添えられた文章はAIによって生成されており、Visual GLMを使用して画像を認識し、GPTを使用して文章を生成しています

无文本的图 / Image without text

中文配文

English version

日本語

接下来是生成教程 / Next is a tutorial on how to generate this image
首先生成不含地球的图片 / First, generate the girl without the Earth

请下载这张图查看参数和提示词 / Please download this image to view the parameters and prompts.
接下来用 PS P 一个地球在胸前,不用 P 得很好,靠 AI 局部重绘使之完美融合 / Next, use Photoshop to place an Earth in front of the breast. It doesn't have to be perfect. Use AI to inpaint and seamlessly blend it for a perfect integration.

上面这张是我 P 的图,可以看到其实就是直接把图放在胸前,毫无技术含量 / The image above is one that I edited. As you can see, I simply placed the image directly in front of the breast without any technical skill involved.

接下来把这张图放进局部重绘功能里,然后用蒙版涂掉地球及其附近的区域,选择重绘蒙版区域,且重绘全图,调整重绘幅度至 0.8 左右然后用以下提示词:(broken earth \(planet\) between breasts:1.2), (broken earth \(planet\) squeezed by breasts:1.2)
Next, take this image and use the inpainting function. Draw a mask to cover the Earth and its surrounding area. Select the mask area for inpainting, and inpaint the entire image. Adjust the denoise strength to around 0.8. Then, use the following prompts: (broken earth \(planet\) between breasts:1.2), (broken earth \(planet\) squeezed by breasts:1.2)

可以看到就画出了地球被双乳挤压得效果 / As you can see, the effect of the Earth being squeezed between the breasts has been depicted.

接下来只重绘地球,做出一点毁灭的特效就可以了 / Next, only inpaint the Earth and create some destruction effects

View Post

吞噬地球的巨大少女 / Giantess Girl Eating Earth

最近出的流程最简单的一张图了,大致 t2i -> inpainting -> i2i + tile -> inpainting -> upscale -> i2i + tile
This one has the most simplified process of recent images: t2i -> inpainting -> i2i + tile -> inpainting -> upscale -> i2i + tile.

首先生成人物,这里我选择白毛红瞳的少女,提示词可以下载图片查看。
First, generate a character. Here I choose a girl with white hair and red eyes. You can download the image to see the prompts.

打开 PS,网上随便找一张地球的图,P 到嘴前(不用 P 的很好,只要让 AI 理解那是地球即可,靠 AI 来融合进图里)
Open Photoshop and find a random image of the Earth online. Place it in front of the character's mouth (it doesn't have to be perfectly edited, just enough for AI to understand it represents the Earth). Let AI handle the integration into the image.

接下来把上面这张图放进局部重绘里,把地球附近涂上蒙版,重绘部分选 only masked,提示词填:
Next, place the above image into the inpainting tool. Apply a mask around the vicinity of the Earth and select "only masked" for the inpainting area. Fill in the prompt with the following words:
earth \(planet\), steam, saliva, saliva trail, open mouth, steam from mouth, heavy breathing

得到一张差不多的图后放进图生图放大 + 修复细节使之融合得更好,具体而言,打开 ControlNet tile 模型,分辨率调为之前的两倍即 1024 x 1536,重绘幅度在 0.5 左右,可以得到下面这张图
After obtaining a relatively good image, put it into the img2img and upscale to enhance its integration and fix details. Specifically, open the ControlNet tile model and adjust the resolution to twice the previous size, which is 1024 x 1536. Set the denoise strength to around 0.5. The resulting image is as follows:

然后在放进局部重绘,略微修一下地球附近的雾气,修好后放进图生图 2 倍超分辨率到 2048 x 3072。
Next, send the image into inpainting and make minor adjustments to the haze around the Earth. Once the adjustments are complete, proceed to the img2img and perform a 2x super-resolution upscaling to 2048 x 3072 resolution.

最后再放进图生图,用 ControlNet tile,重绘幅度 0.3 小幅度重修一下即得到了成品图。
Finally, send the image into img2img again, using the ControlNet tile model. Apply a denoise strength of 0.3 to make minor adjustments. This will result in the final image.

View Post

又一张多步合成图 / Another img by multi-step synthesis

底图 / Base image:

与上一个帖子类似的处理 / Almost the same processing steps as the last post.

另外出了一张用不同放大算法的 / A result using different upscaling algorithm:
使用了 tiled diffusion noise inversion 配合 ControlNet tile 模型


View Post

一种合成工作流 / A Workflow for Composition

English version is in the second half of the article.
先放效果 / First, let's see the result:

我自己个人平时出图基本上是文生图(叠加巨大娘模型/ControlNet)直接出图,再做局部修复/高清修复,但是对于一些特定的互动很随机。
启发:在 arca 上看到的一个大佬的 AI 图,猜测至少是两步合成(文生图 + 图生图/局部重绘)+ (PS 手修? 再配合 AI 反复)。优点是比较可控,能做到很好的互动效果,缺点就是很花时间很麻烦(笑)。
首先出人物(底模直接出),不用叠加巨大娘的模型(参数可以直接下载原图查看,见 FAQ):接下来先用局部重绘出天空背景,原理很简单,画个遮罩把人物和上半部分罩住,然后提示词给天空和云(强度拉高)。
为什么不直接重绘背景?直接重绘容易把上半部分也画出城市来,所以先把上半部分重绘成天空。这个是遮罩(使用 GitHub - continue-revolution/sd-webui-segment-anything: Segment Anything for Stable Diffusion WebUI 插件生成,提高效率免得手动在 PS 里画)。同理接下来就是画下半部分的遮罩,然后局部重绘下半部分,这个时候可以选择使用巨大娘模型来辅助出城市,或者用一张城市的图片放进 ControlNet 用 Reference Only 预处理器。
除此之外,还想做到房屋插入的效果,可以用 ControlNet 语义分割模型来辅助 (seg),在想要的地方画一个大厦(下图的灰色色块)。最后可以再修一下不满意的细节或者直接高清修复出图了。

--------------------- English Version ---------------------------

Personally, when I create images, I usually use txt2img (together with a giantess model or using ControlNet) to generate the initial image, and then I perform some repairs or high-res fix. However, for certain specific interactions, it tend to be very random and difficult.
Inspiration: I saw an amazing AI image on arca. I speculate that it is a composite of at least two steps (txt2img + img2img/inpainting) combined with manual editing in Photoshop and iterative AI processing. The advantage is that it offers better control and can achieve impressive interactive effects. However, the downside is that it is time-consuming and can be quite cumbersome.
First, generate the character (directly output using the base model) without using a giantess model (parameters can be viewed by downloading the original image, see FAQ).Next, use inpainting to paint the sky background. The principle is simple: create a mask to cover the character and the upper part, and then provide prompts for the sky and clouds (increase the intensity).
Why not directly inpaint the background? Directly inpainting can easily result in painting the city in the upper half as well. That's why I first inpaint the upper half to resemble the sky.The above is the mask (using GitHub - continue-revolution/sd-webui-segment-anything: Segment Anything for Stable Diffusion WebUI plugin to generate, which can increase efficiency instead of creating mask manually in Photoshop).
Similarly, the next step is to create a mask for the lower half and then perform inpainting on it. At this point, you can choose to use a giantess model to assist in generating the city, or use an actual city image and process it with ControlNet using the "Reference Only" preprocessor.
In addition to that, I also want to achieve the effect of inserting buildings. This can be assisted by using the ControlNet semantic segmentation model (seg). Simply draw a building in the desired location (represented by the gray block in the image below).Finally, you can make further adjustments to unsatisfactory details or directly perform high-res fix to finalize the image.

View Post

514

View Post

Tips for using ControlNet Tile / ControlNet Tile 使用技巧

English version is in the second half of the article

最近试了试新的 ControlNet 1.1 中的模型,发现 tile 模型改图/修图/放大非常强。

首先这是一张底图,是用最新的模型生成的。(模型我还在调,现在训练出来有两个还不错的模型,但均有着不同的缺点,其中一个(上面这张图用的)对姿势支持较好但对画风影响很大,另一个相反)。如果想试用现在的模型可以给我留言。

然后将其送进图生图来修改使得这张图变得更加色色,打开 ControlNet 预处理器选择 tile_resample,模型选择 control_v11f1e_sd15_tile,Control Mode 选择 My prompt is more important 使提示词影响更大。与此同时可以再叠加一个 ControlNet lineart 使得对人物整体构图影响更小(这个是可选的)。

然后输入提示词,输入自己想要的东西,比如让胖次更透 see-through panties,加点雾气 steam fog, steam from mouth, steam between legs,再加点 pee, peeing, airplane on fire destroyed under urine,重绘幅度 0.5~0.7,就可以得到

上面这张图是高清修复后的,高清修复现在也可以用 tile 辅助,感觉细节比之前的方式要好。操作上的唯一区别就是,打开 ControlNet 用 tile,然后可以把重绘幅度提高到 0.5 左右。

---------------- English Version ------------------

Recently, I tried the new ControlNet 1.1 model and found that the tile model is very powerful for image editing, retouching, and upscaling.

Firstly, this is a base image generated using the latest model. (I am still tuning the model and have trained two decent models but with different drawbacks. The one used for this image has better support for poses but significantly affects the style of the image, while the other is the opposite.) If you would like to try the current models, please leave me a message or comment.

Then, send the image into img2img to make it more sexy. I opened the ControlNet, and selected preprocessor as "tile_resample", chose the model "control_v11f1e_sd15_tile", and selected "My prompt is more important" as the Control Mode to make the prompt more influential. At the same time, you can also added a ControlNet lineart to reduce the impact on the overall composition of the characters (This one is optional).

Then, input the prompt with some desired elements, such as making the panties more see-through "see-through panties", adding some steam "steam, fog, steam from the mouth, steam between the legs", and some more prompts "pee, peeing, airplane on fire destroyed under urine". Do not forget to set the denoising strength to 0.5~0.7. Here's what I got:

The above image is the result of high-resolution upscaling, which can now also be assisted by using the tile model. I feel that this method produces better details than before. The only difference in operation is that I opened ControlNet using the tile model and increased the denoising strength to around 0.5.

View Post

New Model Test 新模型测试

最新训练的一个新模型 jvdaniang_v10,还在测试,等 checkpoint 基本挑好了,我就先放上来。这张图是文生图且仅使用了这个新模型,没有任何后处理,没有用 ControlNet 辅助。手的问题是目前 AI 现状还是得修...

I've just trained a new model jvdaniang_v10, and it's under testing now. After reviewing and selecting a relatively good checkpoint, I'll release it. This image was generated using txt2img only using this new model, without any post-processing, even without ControlNet. The hand still needs to be fixed manually...

View Post

巨大灵梦 Giantess Reimu

View Post

Some work-in-progress images 一些正在做的图

Warning: These images are still work-in-progress and most of them have not been carefully selected or upscaled in high resolution. Some may be regenerated or fixed by inpainting.

警告:这些图还未完成,多数还未经高清修复/仔细筛选,部分可能会重新生成/局部重绘修一下

View Post

fufu (just a try, really strange 只是试了试非常怪)

随便乱玩,试了试 fufu,要笑死我了,太怪了

Just a try with fufu, really funny :)

View Post

How to synthesize a shrunken city 怎样合成缩小城市

Please read the FAQ first
中文版本在文章后半部分


General idea: Use inpainting to draw tiny cities

First, you need to use an inpainting model. Since many checkpoint models do not provide a version specifically for inpainting, using these models directly for inpainting will be very random. Therefore, we need to create a model with stronger inpainting ability using the model merging function. First, download the clean original model v1-5-pruned.safetensors of stable-diffusion 1.5 and its inpainting model sd-v1-5-inpainting.ckpt, and put them all into the Stable-Diffusion folder.

Open the stable-diffusion webui, click on the Checkpoint Merger tab, select the sd-v1-5-inpainting.ckpt as model A, select the model you want to create as model B (for example, AOM3A1B), and select v1-5-pruned.safetensors as model C. Select Multiplier 1 and Add difference for the interpolation method.

Why do this? You can see that the model produced is actually A + M * (B - C) = A + (B - C), where A is a clean base model with inpainting capability, and B - C is the part of the B model that is unique after removing the original model. By adding the unique part into the inpainting base model, a specific model with inpainting functionality is obtained.

How to draw a shrunken city using inpainting:
In img2img, selecting inpainting and choose only masked. Use the Miniature world style 微缩世界风格 model.
Note that this is the LyCORIS LoHa model, which requires the use of either the sd-webui-locon or sd-webui-lycoris plugin. The former is used in the same way as the regular LoRa model, while the latter is changed to <lyco:Model:Weight>.If the inpainted city is too small or feels too independent from the overall picture, consider enlarging the mask for inpainting.
After inpainting the city, you can use img2img to further refine the details (using ControlNet to control the overall image and preserve the small city), and then do the high-res fix.

---------- 中文 -----------

原理:利用局部重绘定点绘制

首先需要使用制作局部重绘模型:由于很多 checkpoint 大模型没有提供专门用于局部重绘的版本,直接使用这些模型来重绘会非常的随机和抽奖。所以一般利用模型合并功能自己制作一个重绘能力相对更强的大模型。

首先下载 stable-diffusion 1.5 的干净原模 v1-5-pruned.safetensors 以及其局部重绘模型 sd-v1-5-inpainting.ckpt, 都放入 Stable-Diffusion 文件夹中。

打开 stable-diffusion webui,点击 Checkpoint Merger 选项卡, A 模型选择 sd-v1-5-inpainting.ckpt, B 模型选择你想要制作的模型(比如这里用 AOM3A1B),C 模型选择 v1-5-pruned.safetensors
Multiplier 选择 1,插值方式选 Add difference。

为什么要这样做?
可以看到做出来的模型其实是 A + M * (B - C) = A + (B - C),A 为干净的具有重绘能力的底模,B - C 为除去原始模型后 B 模型特有的部分,把特有的部分叠加到重绘底模上就得到了具有重绘功能的特有模型。

怎样定点绘制缩小城市:
图生图选择局部重绘,选则仅蒙版,配合 Miniature world style 微缩世界风格 模型
注意这是 LyCORIS LoHa 模型,需要配合插件 sd-webui-locon 或者 sd-webui-lycoris 使用,前者与普通 LoRa 模型用法一致,后者改为 <lyco:Model:Weight>如果重绘出的城市太小/感觉与画面过于独立,可以考虑把重绘的模板扩大。

重绘出城市后,可以用图生图再次修细节(用 ControlNet 控制住整体的图,保留住重绘出的城市),然后再高清修复。

View Post

Reimu's Shrunken City 灵梦的缩小城市

View Post

Some work-in-progress images 一些正在做的图

Warning: These images are still work-in-progress and most of them have not been carefully selected or upscaled in high resolution. Some may be regenerated.

警告:这些图还未完成,多数还未经高清修复/仔细筛选,部分可能会重新生成

The parameters used are the same as Flandre's, except that the character prompt was changed to "Hakurei Reimu" and the blood was removed. Additionally, some images were generated using a new checkpoint model called ambientmix (which I quite like the colors of).

使用的参数与芙兰的一样,只是角色提示词改为“博丽灵梦”,并去掉了血。此外,还使用了一个名为 ambientmix 的大模型 (我很喜欢它的色彩表现).

View Post

Giantess Youmu Reproducing Guide 巨大妖梦复刻教程

Please read the FAQ first
中文版本在文章后半部分

The guide to reproduce this Giantess Youmu 巨大妖梦 | tsuhonki on Patreon
复刻这张图的教程 Giantess Youmu 巨大妖梦 | tsuhonki on Patreon

Stable Diffusion model: AOM3A1B
VAE model: kl-f8-anime2
LoRA model: jvdaniang_v3
Clip Skip: 2

Prompts:

best quality, ultra high res, masterpiece, ultra-detailed, illustration, from below,
1girl, kneeling, full body, (konpaku youmu:1.2), outdoors, open mouth, light smile, giantess girl, sky, blue eyes, horizon, loafers shoes, white kneehighs, feet up,
(very small cityscape), mountainous horizon, horizon, smoke,  <lora:jvdaniang_v3:0.2>, jvdaniang

Negative Prompt:

(nsfw, nipples, pussy:1.4), realistic, (worst quality, low quality:1.4), thick thighs, (abs, muscular, rib:1.2), greyscale, monochrome, dusty sunbeams, trembling, motion lines, motion blur, emphasis lines, text, title, logo, signature, skin spots, acnes, skin blemishes, age spot, manboobs, mutated hands, blurry, (bad anatomy:1.21), (bad proportions:1.331), extra limbs, (disfigured:1.331), (more than 2 nipples:1.331), (missing arms:1.331), (extra legs:1.331), (fused fingers:1.61051), (too many fingers:1.61051), (unclear eyes:1.331), bad hands, missing fingers, extra digit, bad body, penis, dick, strong, grass, tree, (long neck:1.4), barefoot

Sampler: DPM++ SDE Karras

Sampling Steps: 28

Resolution: 1024 x 512 (Hires.fix R-ESRGAN 4x upscale to 2048x1024, then img2img upscale again to 4096x2048)

CFG Scale Prompt Sensitivity: 14

Plugin Enable Dynamic Thresholding (CFG Scale Fix): Change CFG Scale Scheduler to Half Cosine Up and set Minimum value of the CFG Scale Scheduler to 3.5

ControlNet (requires Multi-ControlNet enabled):

  • Type: Weight, Guidance Start ~ Guidance End. Download the images in the attachments
  • keypose: 0.6, 0 ~ 0.6
  • openpose: 0.6, 0~0.6
  • depth: 0.5, 0 ~0.5
  • seg: 0.45, 0 ~ 0.6
  • canny: 0.4, 0.4~0.8

------------------------------ 中文 -----------------------------

请先阅读 FAQ 常见问题

Stable Diffusion 模型:AOM3A1B
VAE 模型:kl-f8-anime2
LoRA 模型:jvdaniang_v3
Clip Skip: 2

提示词:

best quality, ultra high res, masterpiece, ultra-detailed, illustration, from below,
1girl, kneeling, full body, (konpaku youmu:1.2), outdoors, open mouth, light smile, giantess girl, sky, blue eyes, horizon, loafers shoes, white kneehighs, feet up,
(very small cityscape), mountainous horizon, horizon, smoke,  <lora:jvdaniang_v3:0.2>, jvdaniang

负向提示词:

(nsfw, nipples, pussy:1.4), realistic, (worst quality, low quality:1.4), thick thighs, (abs, muscular, rib:1.2), greyscale, monochrome, dusty sunbeams, trembling, motion lines, motion blur, emphasis lines, text, title, logo, signature, skin spots, acnes, skin blemishes, age spot, manboobs, mutated hands, blurry, (bad anatomy:1.21), (bad proportions:1.331), extra limbs, (disfigured:1.331), (more than 2 nipples:1.331), (missing arms:1.331), (extra legs:1.331), (fused fingers:1.61051), (too many fingers:1.61051), (unclear eyes:1.331), bad hands, missing fingers, extra digit, bad body, penis, dick, strong, grass, tree, (long neck:1.4), barefoot

采样器: DPM++ SDE Karras
采样步数 Steps: 28
分辨率: 1024 x 512 (Hires.fix 高清修复 R-ESRGAN 4x 上采样至 2048x1024, 然后 img2img 图生图再放大到 4096x2048)

CFG Scale 提示词敏感度:14

插件启用 Dynamic Thresholding (CFG Scale Fix): Change CFG Scale Scheduler to Half Cosine Up and set Minimum value of the CFG Scale Scheduler to 3.5


ControlNet(需要启用 Multi-ControlNet):

  • 类型: 权重, Guidance Start ~ Guidance End. 请在附件中下载对应图片
  • keypose: 0.6, 0 ~ 0.6
  • openpose: 0.6, 0~0.6
  • depth: 0.5, 0 ~0.5
  • seg: 0.45, 0 ~ 0.6
  • canny: 0.4, 0.4~0.8


View Post

Frequently Asked Questions about Creating Giantess Pictures using AI / 用 AI 生成巨大娘图片的常见问题

中文版本在文章的后半部分

1. What are you using to generate these images?
I'm using stable-diffusion-webui and deploying locally.

2. How can I view the prompt used for your images?
Please download my original image, then open stable-diffusion-webui and find the "PNG Info" option in the top section of the web page (located in the same row as "txt2img" and "img2img").

3. What models are you using?
Stable Diffusion (Checkpoint): Chilloutmix-Ni-Pruned-fp32-fix (used for realistic images),AOM3A1 (the flat painting style of anime images),AOM3A1B (anime images between flat painting and artistic style)
LoRA model:jvdaniang_v3 (a model I trained by myself for creating giantess images, with clear buildings and cities but lacks rich poses),Giantess | Concept (a high-quality model for generating giantess images with support for low angles, but the cities may appear blurry)
VAE: kl-f8-anime2 (for anime-style images),I do not use VAE for realistic images

4. I used your model and your prompts, why can't I generate the same images?
Some images may have used ControlNet/other plugins, so you need to use the same plugins with the same parameters to produce the same image. You can refer to the information in my reproducing guides. Additionally, some images may be "img2img", so you need the original image to generate them. Also, differences in sampling parameters such as eta and sigma can result in slight differences in the generated images.

-------------------------- 中文 -----------------------------

1. 你在用什么生成这些图片?
我用的是 stable-diffusion-webui,并在本地部署。

2. 怎样查看你的图片的提示词?
请下载我的原图,然后打开 stable-diffusion-webui,在网页上部找到 PNG Info 选项(和文生图 txt2img,图生图 img2img 处在同一行)

3. 你在用哪些模型?
Stable Diffusion (Checkpoint 大模型): Chilloutmix-Ni-Pruned-fp32-fix (用于真实感图片),AOM3A1 (偏向于平涂风格的二次元图像),AOM3A1B (介于平涂和艺术风之间的二次元图像)
LoRA 模型:jvdaniang_v3 (由我自己训练的用于生成巨大娘的模型,建筑物和城市比较清晰,但缺少丰富的动作),Giantess | Concept (质量很不错的一个生成巨大娘的模型,支持低视角,但城市会模糊)
VAE: kl-f8-anime2 (用于二次元图像),真实感图像我不使用 VAE

4. 我用了你的模型和你的提示词,为什么不能生成一样的图片?
一些图片使用了 ControlNet/其它一些插件,你需要和我保持一致才能生成一样的图,可以参考我的复刻教程里的信息。另外一些图片可能是图生图,你需要有原图才能复刻。此外,采样器参数如 eta 和 sigma 的不同也会造成图片有略微的差距。

View Post

Giantess Girl 巨大少女

View Post

Giantess Koishi 巨大恋恋


View Post

Tutorial on using control-seg to generate micro cities / 使用 ControlNet 语义分割生成小城市的教程

First, please download the color_coding_semantic_segmentation_classes.xlsx file in the attachment.
From this, you can see that the color value of the sky is RGB (6, 230, 230), and the color value of the building is RGB (180, 120, 120).
Using semantic segmentation in ControlNet allows for generating corresponding objects on their respective color blocks. That is to say, if a (180, 120, 120) color block is painted on a blank canvas, a building will be generated in the corresponding position when generating the image.
For example, in the image above, you can see that there are many messy (180, 120, 120) color blocks in the lower half of the picture, which were sprayed randomly with a spray gun. By using this image as a reference and enabling the semantic segmentation model of ControlNet, a small city can be generated in the lower half of the image. The green part in the middle of the image represents the mountains, which can be used with the prompt "mountainous horizon" to generate a horizon composed of mountains, which can be used to transition with the sky and make the image more natural. The blue part at the top represents the sky.Some parameter recommendations: You can adjust the parameters according to the image. The weight should not be too high, otherwise, it will easily generate a clear boundary between the sky and the ground (usually around 0.45).

----------- 中文 -------------

首先,请下载附件中的 color_coding_semantic_segmentation_classes.xlsx
从中可以看到,天空 (sky) 的颜色值为 RGB (6, 230, 230),建筑物 (building) 的颜色值为 RGB (180, 120, 120)。
在 ControlNet 中使用语义分割可以控制在对应的色块上生成对应的物体,也就是说在一个空白的画布上涂一个 (180, 120, 120) 的色块,那么生成图的时候对应的位置就会生成建筑物。
比如上面这一张图,可以看到图片下半部分有很多很乱的 (180, 120, 120) 色块,这是用喷枪乱喷的,将这张图用于参考,启用 ControlNet 的语义分割模型后,就能在下半部分生成小城市。图片中间的绿色部分表示的是山脉,可以配合提示词 mountainous horizon 来生成由山脉组成的地平线,可以用于与天空过渡,使得图片更加自然。而最上面的蓝色部分表示的就是天空了。一些参数推荐:可以按图中的参数调,权重不宜太高,否则容易生成很明显的天空与地面的分界线(通常为 0.45 左右)

View Post

Giantess Youmu 巨大妖梦

Tried a horizontal version of images.

尝试了一下横版的图片

View Post

Giantess Flandre's Crush 巨大芙兰的踩踏

View Post